Category: Checkpoint NG/NGX/GAIA
(page 1 of 10)
Just took part in the webcast by Checkpoint
How to use R80.10 API for Automation and Streamlined Security and here are some thoughts about it.
- API is all about working with Management server (but read on)
- We can set some things on a firewall Gateway as well via API and Management Server, but very few.
- Web API works as Rest API (JSON/XML), so any automation tool that can emit HTTP requests will work.
- Web API requests are sent to https://r80-mgmt-ip/web_api/ after client has authenticated to the Management Server.
- Almost everything in R80 Management Server is stored in the database and not proprietary local files as before.
- The Workflow is such: Login to https://mgmt-ip/web_api/login -> Send some API action via HTTPS https://mgmt/web_api/add-host (changes are not implemented/saved yet) -> Publish them htps://mgmt/web_api/publish (changes are saved) -> finally Install Policy https://mgmt/web_api/install_policy (Optionally but recommended) On each sent (usually using POST) request for changes verify that you got 200 OK reponse
Actually there are few programming interfaces so to speak:
- Web API as described above, most suited for automation.
- mgmt_cli: standalone tool (both for Gaia OS and Windows Management ) that communicates with Management locally, thus can be scripted on the server (Windows batch/Powershell/etc, Linux shell scripting/Python/etc)
- SmartConsole cli: built-in shell inside the SmartConsole. You just click its link/icon in the SmartConsole and get the shell (emulation). While it is not very suitable for automation, you can still prepare bunch of cli commands to copy and paste to this shell.
- Gaia cli: the classic Gaia shell (clish) programmable locally via Bash scripting.
The main advantage of the API is in automating daily tasks. Some tasks I can think of: deploying gateways to the cloud (AWS/Azure), creating/deleting/editing objects and rules in the Rule Base, creating your own custom web interfaces to the management server and many more. In the webcast, the presenter
Ryan Darst showed in real time how using Ansible playbook he could deploy 2 firewall Gateways from scratch into the Amazon AWS cloud, then create their rule bases with network objects, setting on the way all the needed properties of the gateway – IP addresses, routing, anti-spoofing and such. It took him some 10-12 minutes from starting Ansible deployment to having fully functional 2 gateways in the cloud that could pass and secure traffic for the networks behind them.
Doing non trivial things is not, on the other hand, the target of the API. That is, changing the underlying Gaia operating system, doing backups and other things that we are used of doing via bash scripts on the gateway remain as such. This is logical after all, the API in general are designed to automate “boring” daily tasks of large volume and also give management access/capabilities to the less qualified folks. You can for example build web interface and make available very specific tasks and commands to your SOC team, without giving them the powers to destroy something.
In the Enterprise environment, where it is a small team/one person manages the firewall such API usage is less useful, but still, occasionally we can automate time consuming tasks of bulk creation/deletion/import/export of the network objects or rules.
The Checkpoint do not state it clearly in the release notes, but the minimum requirements has changed. If you don’t want to gaze at the stuck browser while doing First Configuration Wizard for an hour or even forever, use these Virtual Machine/Open Server parameters:
- Hard disk space at least 80 Gb
- Ram memory at least 4 Gb
Kernel debug in Checkpoint is not rare as it gives full insight how firewall processes the packets. As the most comprehensive type of debug it also loads the CPU, not catastrophically though but still. If you happen to enable kernel debug and see the system goes overload - the fastest way to disable all kernel debug is by using this command on the command line:
fw ctl debug 0
The last being zero, not ‘o’ .
It is not new to R80 – it has appeared in R77.30 already but somehow went unnoticed, but with R80 all the buzz about multiple administrators this draws the proper attention. I am speaking about GAIA OS administrators roles. Now we can easily create a new role and assign specific commands for a task very granularly! This means that it is not either full expert access on console/ssh, but yes clish access to OS but with very specific capabilities only.
In Checkpoint you have few options in creating NAT rules. Each option creates NAT rules in the NAT Rules policy a bit differently, here is how.
- Automatic Hide rule. Creates 2 NAT rules: one where the source is the object and the destination is the network in which the objects reides, i.e. disables NAT for the same destination case. The second rule is object as a source destination Any, translate to the Hide NAT IP.
- Automatic Static NAT rule. It creates also 2 rules: object as a source with destination Any, translate to the chosen IP, and source is Any destination is object (meaning its external IP) translate to the object (meaning its internal IP).
Always remember of course that Automatic NAT rules are created below the manual ones and Checkpoint passes the rules from the top down so order matters.
The answer is simple – just one. Beware we speak of WRITE access as well here – READ access is available to as many users as you want. But the moment the first user logs in into Gaia he automatically gets the write/read access and all the later logins (it actually can be the same username logging in) get just READ only mode. Any user (if has admin priveleges) can acquire or override the database lock from the current user and this way have write/read role.
Of course all the unsaved changes made by the previous user will be lost.
The usual way to install a policy is by clicking Install in the SmartDashboard of course, but if need arises to do so from the command line of the Checkpoint Management server we do it this way:
fwm load <Name of the policy> <name of the firewall gateway object as appears in management server>
All the names in the command are case sensitive.
The Checkpoint documentation is vague about this, so let me warn you. Immediately after first install and completion of First Configuration Wizard the Checkpoint firewall gateway automatically installs preexisting Initial Policy. Which disables routing through the firewall, and by Checkpoint documentation “enables just necessary management protocols for Management Server connection”. In reality it simply means the firewall is open from ANY by ports of ssh/https/SIC communication. Therefore it is of paramount importance to chose a strong password for Gaia OS admin user – this is the only protection against brute force break in your firewall has until first install of the Security Policy.
This is one the most strong points of the Checkpoints with me from the very beginning. Unlike many other vendors, Checkpoint made possible to configure and easily ANY packet field taking part in NAT. You want IP destination based NAT ? No problem. Source based NAT ? Easy.
Port destination based NAT? Piece of cake. You will appreciate this power once you try to configure destination based NAT in Cisco ASA with access-lists.
They tried to approach this already with Checkpoint Provisioning control, but was too complicated to be adopted by a laymen like as, it was more complicating life of super admin then helping having put burden of approving changes on him.
But with R80 they take the different path – now multiple administrators can edit the same Security Policy simultaneously. And what makes it useful and practical is that granularity of such changes is per security rule. That is, if administrator A changes/changed some rule, the Administrator B will see this rule as greyed out and not editable. On the other hand all other rules are available to Administrator B to work on.
That is nice indeed.
Checkpoint firewalls are pretty dynamic and interactive to our changes, for the most of the changes done by administrator it is enough to install the policy for the changes to take immediate effect. In the rare cases when changes (seemingly) do not take effect, it is probably because the particular connection got stuck in the connection table of the firewall. There are 2 ways to fix it: the elegant and the axe way. I will post the elegant way some other day, which includes deleting only the specific stuck connection entry from the connections table, but this post is about the axe way – clearing ALL connection entries from the table in one go. This means, of course, temporary disconnection for all traffic passing the firewall, therefore use it with caution. Here it is:
fw tab –t connections –x
For the correct functioning the Checkpoint uses quite a lot of ports, some are a must some or not. The ports listed above are in ‘a must’ category. Let’s see:
- 18190 The CPMI (Checkpoint Management Interface) is used by SmartConsole client to connect and manage the Management server. This is the port to check if trying to connect by SmartConsole you get the error “Please verify that Management is running and you are allowed to connect by GUI client”.
- 18209 SIC (Secure Internal Communications) protocol uses this port for all SIC conversations between the Management server and the firewall modules managed by it. This is the port to check when you try to install the Security Policy and it fails with an error “could not establish connection …” .
- 18210, 18211 These ports are used for the internal certificate exchange between ICA ( Internal Certificate Authority) which is part of the Management server and Checkpoint firewall modules. You don’t need this port constantly, the firewall modules and Management server exchange certificates once in a while, but still – all the communication between Management server and firewall modules is encrypted using these certificates, and if the certificate is expired and the new one cannot be downloaded the SIC will break.
It may happen to anyone – mistaken security rule “Any Any Drop”, or using dynamic object for URL block. The end result – after the policy install you have no administrative access to the firewall with SmartDashboard/ssh/https. For this case Check Point came with fw unloadlocal console expert level command to unload the Security Policy. Unlike the Initial policy when installing the firewall, here you get a firewall without ANY policy – open by any port from any source. So probably a good idea to do so after you physically disconnect the firewall from the Internet. Next step is to connect to this “naked” firewall with SmartDashboard and fix the mistake that caused this situation and install the fixed Security policy.
You may need occasionally to disconnect some or all connected users from the firewall forcibly. There are few ways I can think about to do so, for example installing Security Policy clears the cached authentication of the remote users, and while it does not disconnect them it will force a user to reenter his/her credentials. So, if you say want to disconnect a user you could expire it in SmartDashboard or change its password and then push the Security Policy.
But actually there is an easier way to do it : just go to the
SmartView Monitor -> Users -> click on any of the options:
Users by Gateway, Users by Name, All Users, CheckPoint Mobile Users and after finding the user you want to disconnect, right click on it and
Reset Tunnel.
Here is the screenshot of this procedure:
Continue reading
Throughout its history CheckPoint firewall changed versions and names, incorporated other products. The last, so far, evolution has been the Gaia operating system released in 2012. All this holds true of course but nevertheless the base platform for the firewall all these years has been Red Hat Enterprise Linux server of different versions. The latest one used for the whole R75 and R77 line of firewalls is based on Red Hat RHEL 5.2 that was first released in 2008. This in part explains why even new firewalls still work on the old kernel 2.18. It doesn’t mean something bad in terms of its security, to remind - 'based on' means even though it is based on RHEL 5.2 it is still heavily secured and stripped down. In their latest communications Checkpoint promise in 1st quarter of 2017 to upgrade Gaia to the kernel version 3.10 as part of the move to Red Hat RHEL 7.
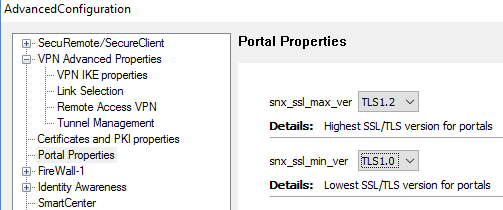
With a lot of attention recently to the SSL protocol vulnerabilities browser vendors
increase security of their SSL implementation almost daily. One of the recommendations is to
use the most up to date SSL version available. Check Point for its SSL based VPNs (by the way
it is the same configuration for Endpoint clients) like SNX SSL and Mobile Access can support
SSL versions in the range SSLv3 up to TLS 1.2. So if your clients’ browsers support it you
can force the specific SSL version for their connections.
Warning: do NOT set minimal SSL version higher than TLS 1.0 because this would cause internal
communication of applications of the Check Point itself to fail.
You set the parameters here:
SmartDashboard -> Global Properties -> SmartDashboard Customization-
> Configure -> Portal Properties-> snx_ssl_max_ver and snx_ssl_min_ver

As usual for changes to take effect - click on Ok, Save, Install Policy
There is one setting that may expose your networks and firewall to unexpected dangers if used inadvertently. I mean Star VPN Community -> Advanced Settings -> VPN Routing . You can see there 3 options: To center only, To center and to other satellites through center, To center or through the center to other satellites, to internet and other VPN targets. If you are not sure, or almost always anyway - choose the 1st option “ To center only” . The other 2 options can be a potential risk allowing remote VPN LANs of one VPN peer to communicate with remote VPN LANs behind another, possibly unrelated VPN peer if rules permit.

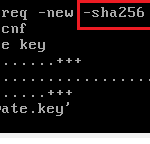
In the light of all the commotion with the recommended by various vendors switch from SHA-1 to at least SHA-256 hash algorithm you may wonder what is the hash used by ICA for internal communication. The answer is - SHA-1 for all the versions still in use, including R77. You can change it to SHA-256 using the command cpca_client acording to Checkpoint sk103840 but I haven’t done it myself so not sure what are implications of this.
With previous generation of Check Point UTM appliances (so called UTM-1 which included UTM 132, 270, 450 etc.) it was a really nagging issue when firewall run out of space on its hard disk. It was especially problematic for the root partition cause it is used for update downloads, upgrade files etc. It is less of a problem today as Check Point folks made root partition by default much bigger than the old UTM-1 one, still from time to time you may need to increase root or some other partition to add free space to the firewall.
As Check Point is a Linux in disguise to do so is actually easy using native Linux tools . Fortunately UTM appliances come with quite a bit of Unallocated space you can see with
fdisk -l.
This unallocated space is used to store images for factory reset in case of need so do not go wild using it up.
For resizing to take effect you will have to reboot the firewall afterwards. Here are commands to be run in expert mode:
Let's say I want to add 15 Gb to the root partition:
Checkpoint# lvresize -L 15GB vg_splat/lv_current
Checkpoint#  resize2fs /dev/mapper/vg_splat-lv_current
That is it .
BTW Officially, it is not supported by Checkpoint to modify the size of partitions / file systems on Check Point appliances. Still, many times I've done it I didn't experience any issues, but be aware.


