yurisk.info

Yuri Slobodyanyuk's blog on IT Security and Networking sharing experience and expertise

Page 2 of 24

Checkpoint Mobile Access support for SHA-256 SSL certificates

The new era of sha-256 as opposed to sha-1 signed SSL certificates is slowly gaining the pace, not without a gentle push from the browser providers . And Checkpoint is catching up in its new version R77.30 for Open Servers.
While on both versions – 77.20 and 77.30 cpopenssl package gives the same version info they do differ:

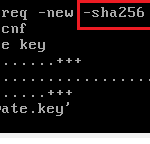
cpopenssl command accepting -sha-256 option

openssl in R77.30 now supports SHA-256 certificates

It doesn’t mean earlier versions do not support SHA256 certificates – just that you cannot issue CSR requests signed with SHA256. Nevertheless, your SSL certificate provider technically is very much able to issue SHA-256 certificate based on SHA-1 signed CSR requests as both are not really related.

The difference between local and central licenses in Check Point firewall

The difference is simple - the Local license is issued for the firewall gateway IP address, while Central license is issued and assigned to the IP address of the Management SmartCenter. In more practical terms it means you can attach/un-attach/re-attach Central license to/from Gateway(s) as many times as needed as long as IP address of the SmartCenter doesn’t change, thus allowing the same license to be used for different firewall gateways throughout the lifetime of the license or just changing IP addresses for the same gateway. The Local license is not like that - from the beginning it is being issued by CheckPoint for a specific IP address of the firewall gateway and later if you want to change this IP address you have to ‘move’ the license to the new IP - and you can do it just 6 times, after that you have to buy a new license.

How to know which policy and since when is installed on Check Point firewall

In an environment with multiple firewalls it is easy to lose track which/when Security Policy is installed on which gateway. We have the easy ways to find out:
  • in SmartView Monitor click on the gateway
  • on the console/CLI of the gateway itself in expert mode type: fw stat -l

Logging everything and then some more Check Point

You may have for some reason, usually it is some compliance requirement (PCI DSS, HIPAA, etc), the need to log everything that passes the firewall, regardless of the Log setting of each Security Rule. Check Point have thought of this need too - go to Global Properties -> Reporting Tools and click on Enable tracking all rules.
This will NOT interfere with the logging settings in the rule base - this works in parallel. Also you have to specify another than current log server to send logs to, which of course will require a separate license as well. This way you can leave usual Security Policy logging for debug but send complete logs to some dedicated logging server for storage and later retrieval.

Unlock administrator user of the SmartDashboard

This may happen usually for exceeding the limit of wrong password login trials by the administrator. Sometimes this occurs when an administrator did not log out properly from the Smart Console for any reason - his/her PC crashed, connection to the Smart Center was lost, etc. No worries, it is easy to fix, go to the command line of the Smart Center, then (if not already) into the expert mode and type:
fwm lock_admin -u <account name>

Check Point move SmartCenter or Management server logs to another server for viewing

This question comes up from time to time - can we copy logs of some SmartCenter to another server with installed SmartCenter software to view it. Usually you need this for archival storage of logs - you don’t want to keep terabytes of logs on the active SmartCenter just as archive. The answer is yes - you can copy binary log files to another Management center or file storage to be later opened NOT in the original server. Technically you do it as any file sync/transfer/backup of the Linux platform - what you need is all file in $FWDIR/log directory.

Most frequent mistake in configuring Identity Awareness in Check Point

While Identity Awareness is relatively new to the Check Point firewalls, its ‘working horse’ is nothing but new - LDAP connection to the Active Directory Domain Controller. As quite extensive and complex component Identity Awareness earned its own tab in configurations menu but still, before you start configuring make sure that underlying Active Directory service is enabled and configured. And you do so by first enabling in Global properties “User Directory” that exists as I can remember at least since R55 there. To make it visual here is the screenshot where to find it:

enable active directory connectin in checkpoint firewall

Where on the OSI model does the Check Point firewall works ?

The firewall itself is implemented as a bunch of kernel modules that plug into LInux kernel (2.6.18 as of R77.30) . From OSI model standpoint it plugs itself between the Data Link Layer and the Network Layer. It means Check Point can inspect any packets bearing IP addresses in their headers. It also means that it does not check/verify/care for Layer 2 information. So it cannot inspect Ethernet headers for example.

SNMP in Gaia default community string

Configuring SNMP in Gaia as opposed to SPLAT has been made much simpler. So simple that it is easy to overlook that default configured read-only community is public .
So , it is a good idea to change it while enabling SNMP:
set snmp agent on
set snmp agent-version any
set snmp community public read-only

PS. Another ‘feature’ of the SNMP is that you can either enable SNMP version 1 and 2 or version 3. Trying to enable just version 2c is not possible.

RIPE database query for a route object, or why my network is not advertised via BGP to the world

Once it was a nice-to-have configuration that most ISPs in the world ignored anyway, but today it is a must if you are planning to advertise your networks via BGP through your uplink provider – your route object in the AS whois database of the uplink provider. If not – you will happily advertise your networks, the uplink provider will duly advertise them to its uplink peers, which will check AS registry database of your provider and not finding this route object will silently drop the advertising.
Of course it is duty of your transit ISP provider to update their records with your network, but after all, you are the one most interested – so as they say in Russian ” Доверяй но проверяй ” , and here is how to do it:
whois -h whois.ripe.net — ‘-a -r -i or -T route AS1680’ | grep route
In this example I assume your uplink provider is Netvision with AS1680 , replace AS number with the correct one.
Output will look like:
route: 109.186.0.0/16
route: 109.253.0.0/16
route: 117.121.245.0/24
route: 138.134.0.0/16
route: 147.161.0.0/16

If you don’t find in such listing your network – Houston, you have a problem here.

Cisco CUCM CDR report – call duration and called numbers extraction script

Yesterday I had to extract some data from a CDR report for a client, namely call start time, its duration and the called number. And while I am sure Google has zillion scripts to be found, it was much faster to hack this one-liner .
The script extracts the following fields from the CDR report in this order:
dateTimeOrigination – for outgoing calls it is the time the device goes off hook
callingPartyNumber – initiator of the call
finalCalledPartyNumber – the reached/dialed number (after forwarding if any)
duration – duration of the call
The extracted data is placed in CSV format to be easily imported into Microsoft Excel.
Enjoy. Any questions – feel free to ask here.

 awk -F, ‘BEGIN {OFS=","} {print strftime("%c",$5),$9,$31,$56}’  report_cdr  

Output:
Sun 04 May 2014 01:54:37 PM IDT,0555555555,2988,41
Sun 04 May 2014 01:55:07 PM IDT,2908,0555555555,25

In case you want to extract some other fields from CDR , here is the full list of available values and their position. For explanation you can look here – Cisco Call Detail Records Field Descriptions

1 cdrRecordType
2 globalCallID_callManagerId
3 globalCallID_callId
4 origLegCallIdentifier
5 dateTimeOrigination
6 origNodeId
7 origSpan
8 origIpAddr
9 callingPartyNumber
10 callingPartyUnicodeLoginUserID
11 origCause_location
12 origCause_value
13 origPrecedenceLevel
14 origMediaTransportAddress_IP
15 origMediaTransportAddress_Port
16 origMediaCap_payloadCapability
17 origMediaCap_maxFramesPerPacket
18 origMediaCap_g723BitRate
19 origVideoCap_Codec
20 origVideoCap_Bandwidth
21 origVideoCap_Resolution
22 origVideoTransportAddress_IP
23 origVideoTransportAddress_Port
24 origRSVPAudioStat
25 origRSVPVideoStat
26 destLegIdentifier
27 destNodeId
28 destSpan
29 destIpAddr
30 originalCalledPartyNumber
31 finalCalledPartyNumber
32 finalCalledPartyUnicodeLoginUserID
33 destCause_location
Continue reading

Convert Checkpoint SPLAT routes into Gaia configuration commands

Hi there, not much of a script , just the one-liner to turn output of the Secure Platform cli command route/ip route list into the ready for copy&paste list of Gaia clish commands.
Be aware I am not doing any error checking, so examine the final result before applying to a production system.
See ya.
You should run it on SPLAT cli being in expert mode.

ip route list | awk ‘/via/ {print " set static-route ",$1," nexthop gateway address " $3," on "}’

set static-route 172.19.0.0/16 nexthop gateway address 172.12.255.4 on
set static-route 172.20.0.0/16 nexthop gateway address 10.20.20.6 on
set static-route default nexthop gateway address 19.9.15.33 on

PTR bulk resolver in Perl to see what is in the name

There are 50 ways to do PTR resolving in bulk,and this is just one of them. It doesn’t pretend to be the fastest/coolest/best, the only thing
I can claim – it works. So use it for pleasure and work.

[perl]

# Yuri
# 19.02.2013
# this script accepts range of IP addresses to do PTr resolving for
# the range has to be in this format: startIp-endIp.startIp-endIp.startIp-endIp.startIp-endIp.
# Only answers are printed, i.e. if there is no answer nothing is printed
use warnings;
use strict;
use Net::DNS ;

my $res = Net::DNS::Resolver->new();
my $input = shift ;
$input =~ /(.+)-(.+)\.(.+)-(.+)\.(.+)-(.+)\.(.+)-(.+)/ ;
print "Resolving ptrs for the following range: $input\n" ;
print "Started working at: " . scalar gmtime . "\n" ;
my ($oct1_start,$oct1_end,$oct2_start,$oct2_end,$oct3_start,$oct3_end,$oct4_start,$oct4_end) = ($1,$2,$3,$4,$5,$6,$7,$8) ;
foreach my $oct1 ($oct1_start..$oct1_end) {
foreach my $oct2 ($oct2_start..$oct2_end) {
foreach my $oct3 ($oct3_start..$oct3_end) {
foreach my $oct4 ($oct4_start..$oct4_end) {
my $answer = $res->query("${oct1}.${oct2}.${oct3}.${oct4}") ;
if (defined $answer) {
my @ptr = $answer->answer;
foreach my $record_ptr (@ptr) {
#print " NEw " . $record_ptr->print ;
my $str = substr($record_ptr->string,rindex($record_ptr->string,’R’)+1) ;
print "$oct1.$oct2.$oct3.$oct4 " . $str . "\n";
}

}
} } }}

print "Run completed at: " . scalar gmtime . "\n" ;

[/perl]
Example run: #perl script.pl 194-194.90-90.33-33.0-255
Bash script to generate random passwords

Here I stumbled on great intro into Bash scripting for NetOps by John Kristoff ” Introduction to Shell and Perl scripting for Network Operators” and could’t help but do it my way. Here it is, bash
script that generates random password of printable characters, up to 15 at least.
[bash]
#!/bin/bash
# usage: randompass.sh [n] [count] – n is number of characters in password
# to generate 9 by default, and count – number of passwords to generate, 1 by default
n=${1:-9}
counter=${2:-1}
for ii in `seq 1 $counter` ;do
dd count=1 bs=15 if=/dev/urandom 2>/dev/null |
od -a |
sed ‘2d’ |
sed ‘s/0000000 \(.*\)/\1/’ |
tr -d ‘ ‘ | cut -c 1-$n |
sed ‘s/\([a-z]\)/\U&/3’ |
sed ‘s/\([A-Z]\)/\l&/4’
done [/bash]
Download the script
Example.

randompass.sh 7 7

o&sOh~K
deL(HMd
dc23DBg
HK?S@iE
_$SL*Ad
si|}Del
%I-ba

« Older posts Newer posts »

© 2016 yurisk.info

Theme by Anders NorenUp ↑