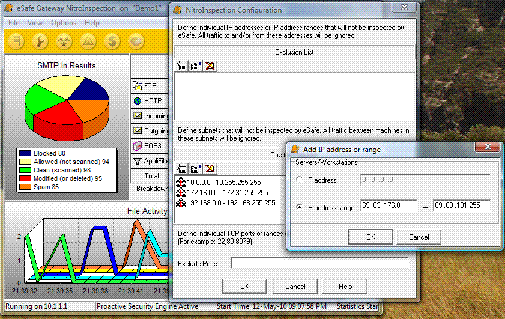
There are times when you need to make some website work immediately while it is being blocked by eSafe for some (many) reasons. And you just don’t get it working the educated way – adding to white/exclude lists, changing script/category block options etc.
For the cases just like that Aladdin have provided us with Exclusion List in NitroInspection Configuration . It basically means traffic to/from the IP addresses you put into this list will be COMPLETELY ignored by eSafe scanning engine, and will be moved from interface to interface at the NIC driver speed.
To get there you go to Options->-NitroInspection Configuration->-Exclusion list->Add
In example below I add facebook.com IP range to such exclusion list.

yurisk.info
Yuri Slobodyanyuk's blog on IT Security and Networking sharing experience and expertise
Page 16 of 24
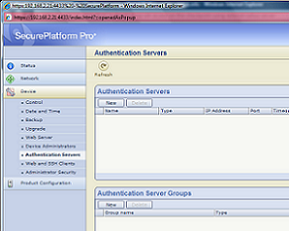
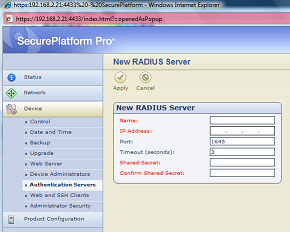
I got asked few times on this rather rarely used feature, and as surfing through the Checkpoint docs can be a bit tedious, I‘ll put it here. SSH user authentication against external server, in this case using Radius protocol, is possible but only if you have VPN Pro featured firewall and accordingly VPN Pro license (Advanced Networking Blade if using Blades). Then using firewall’s WebGUI you will have an option to configure external Radius server to authenticate operating system users. See screenshots below.


This one will be short, just a link to the Tobias Lachmann blog where he shows how using dmidecode you can know what is the version of the UTM you are logged in.
Determine UTM-1 appliance series from cli
Holidays are over, Checkpoint failures are back, so business as usual. Today I want to draw your attention to often overlooked information source – Checkpoint state tables. While running, the firewall creates, keeps and updates various tables it needs for correct functioning. These tables contain parameters that are mostly of use for firewall itself, but you can query them on the cli, sometimes even flush them as well.
To see all tables with its contents you type –
[Expert@Hollywood]# fw tab
To see only table names –
[Expert@Hollywood]# fw tab | grep "\-\-\-\-\-\-\-"
——– firewalled_list ——–
——– external_firewalled_list ——–
——– management_list ——–
——– external_management_list ——–
——– log_server_list ——–
——– tcp_services ——–
——– udp_services ——–
——– internal_interface_list ——–
——– topology_range_list ——–
——– gui_clients_list ——–
——– cp_NG_products_list ——–
——– smtp_av_user_config_match_tab ——–
——– smtp_av_scan_exclusion ——–
——– http_av_user_config_match_tab ——–
——– http_av_scan_exclusion ——–
——– pop3_av_user_config_match_tab ——–
——– pop3_av_scan_exclusion ——– Continue reading
SUN Solaris FTP
SUN Solaris comes with ftp daemon based on WU-FTPd Washington University project.
While not being very enthusiastic about its vulnerabilities discovered over the years and being rather
abandoned by its developers ,still it comes by default and as long as Sun ok with that it is ok with me too.
Below I will shortly introduce configuring it for local user access as well as anonymous one.
By default FTP daemon (in.ftpd) is disabled. Here is the initial state you have it :
disabled 7:21:44 svc:/network/ftp:default
As ftpd is inet managed daemon more information can be queried from inetadm:
name=”ftp”
endpoint_type=”stream”
proto=”tcp6″
isrpc=FALSE
wait=FALSE
exec=”/usr/sbin/in.ftpd -a”
user=”root”
default bind_addr=””
default bind_fail_max=-1
default bind_fail_interval=-1
default max_con_rate=-1
default max_copies=-1
default con_rate_offline=-1
default failrate_cnt=40
default failrate_interval=60
default inherit_env=TRUE
default tcp_trace=FALSE
default tcp_wrappers=FALSE
default connection_backlog=10
Insecure you say , well , you are right – let’s sharpen it a bit.
Enable more detailed logging.
root@Solaris# inetadm -l svc:/network/ftp
name=”ftp”
endpoint_type=”stream”
proto=”tcp6″
isrpc=FALSE
wait=FALSE
exec=”/usr/sbin/in.ftpd -a”
user=”root”
default bind_addr=””
default bind_fail_max=-1
default bind_fail_interval=-1
default max_con_rate=-1
default max_copies=-1
default con_rate_offline=-1
default failrate_cnt=40
default failrate_interval=60
default inherit_env=TRUE
tcp_trace=TRUE
default tcp_wrappers=FALSE
default connection_backlog=10
When execution option –a is given (and it is by default) then ftpd will consult /etc/ftpd/ftpaccess
file for additional restrictions and tweaks. Here are the few that are worth enabling.
Uncomment following lines to have more verbose logging available:
xferlog format %T %Xt %R %Xn %XP %Xy %Xf %Xd %Xm %U ftp %Xa %u %Xc %Xs %Xr
Make sure these changes are applied
Configure anonymous access.
All the configs so far will allow only local valid users to connect by ftp and be automatically
placed in their respective home directories. To allow anonymous ftp access with dedicated chrooted for that folder there is a special set of tools to use. Actually it is just one script that does all the hard work behind the scenes – creates ftp user, creates directory tree , sets up needed permissions, sets up chrooted environment for the anonymous ftp user.
Creating directory /export/home/ftp_pub
Updating directory /export/home/ftp_pub
That is all, now you can login anonymously and download anything from /export/home/ftp_pub/pub directory. To also allow upload there , change the upload option in “/etc/ftpd/ftpaccess” and set accordingly permissions on the Solaris level for the directory pub (777)
#upload class=anonusers * * no nodirs
And finally enable it
Everyone today speaks BGP: Cisco routers, Juniper routers and ScreenOS firewalls, Fortigate does it,even SonicWall have it as planned feature So question is not whether but how. The opportunity to see how it works on Fortigate recently presented itself and here is the sum up of how I configured and debugged Fortigate BGP set up.
[showmyads]
Task at hand: configure BGP peering with Bogon Route project by Team Cymru www.team-cymru.org/Services/Bogons/routeserver.html . More information about the Bogon Routes can be found at the source – www.team-cymru.org/Services/Bogons . But in few words they advertise to you routes that are never to be seen in your network for legitimate reasons. Those are networks not only from RFC 1918 but those reserved by RIPE for special purposes, and those unallocated to anyone as of now.
What we need to know for this set up is this:
- They advertise all the networks with no-export community
- also they attach 65333:888 community (as per their site)
- they use md5 password authentication
- they don’t expect you to advertise to them anything
- in advertised networks next hop is their advertising router
- their AS number is 65333
Based on all the above my Fortigate BGP peer had to :
- enable multihop peering
- use MD5 password authentication
- have route-map to attach no-export community so that we don’t inadvertently advertise learned routes to other peers ( just safety net , in case BGP peer stops attaching no-export community to their routes)
- set next hop for the learned routes to Null 0 interface.
Let’s start configuring something. Important surprise here – in Fortigate GUI you can only set 3 parameters:
As number , Peer Ip and networks to be advertised, the rest is to be done on the command line . So here it goes
1) Configuring route-map to set no-export community on learned networks and force next hop to be some reserved Ip (192.0.2.1 ) that in turn is statically routed to Null interface ,
edit “NO-EXPORT”
config rule
edit 3
set set-community “no-advertise”
set set-ip-nexthop 192.0.2.1
next
end
next
End
2) Configure BGP peer
config router bgp
set as 65002
config neighbor
edit 84.22.96.5
set ebgp-enforce-multihop enable
set remote-as 65333
set route-map-in “NO-EXPORT”
set password “yuiyui”
next
end
config redistribute “connected”
set status enable
end
3) Configure static blackhole route for the reserved IP used as the next hop for this.
config router static
edit 3
set blackhole enable
set dst 192.0.2.1 255.255.255.255
next
End
Validation phase.
All configs are as good as the prove that it works.
List shortly all the peers
BGP router identifier 10.250.250.2, local AS number 65002
BGP table version is 159
2 BGP AS-PATH entries
0 BGP community entries

Neighbor        V    AS MsgRcvd MsgSent   TblVer  InQ OutQ Up/Down  State/PfxRcd
84.22.96.5   4  65333       4       6      159    0    0 00:00:48        0

Total number of neighbors 1
List all BGP neighbors and their peering state
BGP neighbor is 84.22.96.5, remote AS 65333, local AS 65002, external link
  BGP version 4, remote router ID 84.22.96.5
  BGP state = Established, up for 00:00:58
  Last read 00:00:58, hold time is 180, keepalive interval is 60 seconds
  Configured hold time is 180, keepalive interval is 60 seconds
  Neighbor capabilities:
    Route refresh: advertised and received (old and new)
    Address family IPv4 Unicast: advertised and received
  Received 4 messages, 0 notifications, 0 in queue
  Sent 6 messages, 0 notifications, 0 in queue
  Route refresh request: received 0, sent 0
  Minimum time between advertisement runs is 30 seconds

 For address family: IPv4 Unicast
  BGP table version 160, neighbor version 159
  Index 3, Offset 0, Mask 0x8
  Community attribute sent to this neighbor (both)
  Inbound path policy configured
  Route map for incoming advertisements is *NO-EXPORT
  0 accepted prefixes
  19 announced prefixes
  Connections established 1; dropped 0
  External BGP neighbor may be up to 255 hops away.
Local host: 10.250.250.2, Local port: 9188
Foreign host: 84.22.96.5, Foreign port: 179
Nexthop: 10.250.250.1
See the routes learned through the BGP protocol
BGP table version is 161, local router ID is 10.250.250.2
Status codes: s suppressed, d damped, h history, * valid, > best, i - internal,
              S Stale
Origin codes: i - IGP, e - EGP, ? - incomplete

   Network          Next Hop            Metric LocPrf Weight Path
*> 5.0.0.0          192.0.2.1                0             0 65333 65333 i
*> 14.0.0.0         192.0.2.1                0             0 65333 65333 i
*> 23.0.0.0         192.0.2.1                0             0 65333 65333 i
*> 31.0.0.0         192.0.2.1                0             0 65333 65333 i
*> 36.0.0.0         192.0.2.1                0             0 65333 65333 i
*> 37.0.0.0         192.0.2.1                0             0 65333 65333 i
*> 39.0.0.0         192.0.2.1                0             0 65333 65333 i
*> 42.0.0.0         192.0.2.1                0             0 65333 65333 i
*> 49.0.0.0         192.0.2.1                0             0 65333 65333 i
*> 100.0.0.0        192.0.2.1                0             0 65333 65333 i
*> 101.0.0.0        192.0.2.1                0             0 65333 65333 i
*> 102.0.0.0        192.0.2.1                0             0 65333 65333 i
*> 103.0.0.0        192.0.2.1                0             0 65333 65333 i
*> 104.0.0.0        192.0.2.1                0             0 65333 65333 i
*> 105.0.0.0        192.0.2.1                0             0 65333 65333 i
*> 106.0.0.0        192.0.2.1                0             0 65333 65333 i
*> 169.254.0.0      192.0.2.1                0             0 65333 65333 i
*> 172.16.0.0/12    192.0.2.1                0             0 65333 65333 i
*> 176.0.0.0/8      192.0.2.1                0             0 65333 65333 i
*> 177.0.0.0/8      192.0.2.1                0             0 65333 65333 i
*> 179.0.0.0/8      192.0.2.1                0             0 65333 65333 i
*> 181.0.0.0/8      192.0.2.1                0             0 65333 65333 i
*> 185.0.0.0/8      192.0.2.1                0             0 65333 65333 i
List routes that are currently installed in the routing table that were learned by BGP .
B       5.0.0.0/8 [20/0] via 192.0.2.1 (recursive is directly connected, unknown), 00:00:19
B       14.0.0.0/8 [20/0] via 192.0.2.1 (recursive is directly connected, unknown), 00:00:19
B       23.0.0.0/8 [20/0] via 192.0.2.1 (recursive is directly connected, unknown), 00:00:19
B       31.0.0.0/8 [20/0] via 192.0.2.1 (recursive is directly connected, unknown), 00:00:19
B       36.0.0.0/8 [20/0] via 192.0.2.1 (recursive is directly connected, unknown), 00:00:19
B       37.0.0.0/8 [20/0] via 192.0.2.1 (recursive is directly connected, unknown), 00:00:19
B       39.0.0.0/8 [20/0] via 192.0.2.1 (recursive is directly connected, unknown), 00:00:19
B       42.0.0.0/8 [20/0] via 192.0.2.1 (recursive is directly connected, unknown), 00:00:19
After all is configured and saved (and probably doesn’t work) comes the bgp debug round.
Enable bgp debug on the appliance
Enable debug output to console
To stop this output
To verify that debug is on
BGP debugging status:
  BGP events debugging is on
  BGP debug level: INFO
If nothing after that happens try clearing all BGP sessions
The good way to judge something new is to compare it with something you already know. To continue
With that logic I cross-reference debug output seen on Fortigate with the one seen on the Cisco BGP peer. That
way you can decide what is more informative and who wins the race (Cisco of course, what you thought?).
Case 1
One of the peers is configured with wrong AS number.
In Fortigate you see this:
BGP: 84.22.96.5-Outgoing [FSM] State: Idle Event: 3
BGP: 84.22.96.5-Outgoing [NETWORK] FD=15, Sock Status: 0-Success
BGP: 84.22.96.5-Outgoing [FSM] State: Connect Event: 17
BGP: 84.22.96.5-Outgoing [ENCODE] Msg-Hdr: Type 1
BGP: 84.22.96.5-Outgoing [ENCODE] Open: Ver 4 MyAS 65002 Holdtime 180
BGP: 84.22.96.5-Outgoing [ENCODE] Open: Msg-Size 45
BGP: 84.22.96.5-Outgoing [DECODE] Msg-Hdr: type 3, length 23
BGP: %BGP-3-NOTIFICATION: received from 84.22.96.5 2/2 (OPEN Message Error/Bad Peer AS.) 2 data-bytes
Now let’s compare to the debug from Cisco
Mar 24 13:14:55.572: %BGP-3-NOTIFICATION: sent to neighbor 10.250.250.2 2/2 (peer in wrong AS) 2 bytes FDEA FFFF FFFF FFFF FFFF FFFF FFFF FFFF FFFF 002D 0104 FAEA 01B4 0AFA EA02 1302 0201 1400 0100 0132 0222 0012 0222 00
Case 2
MD5 authentication is set on Cisco but not on the Fortigate. Again for comparison
debug from Fortigate and debug from Cisco
Cisco:
Jan 5 10:42:14.299: %TCP-6-BADAUTH: No MD5 digest from 10.250.250.2 (1037) to 84.22.96.5(179)
Fortigate:
84.22.96.5-Outgoing [FSM] State: Connect Event: 9
BGP: [RIB] Scanning BGP Network Routes...
84.22.96.5-Outgoing [FSM] State: Connect Event: 9
BGP: [RIB] Scanning BGP Network Routes...
Case 3 (that actually happened when I configured this Fortigate) is mismatched MD5 password on either side
Fortigate:
Doing summary listing showed peering as down :
84.22.96.5 4 65333 934 1036 0 0 0 never Connect
Cisco:
*Mar 24 13:40:28.800: BGP: Regular scanner event timer
*Mar 24 13:40:28.800: BGP: Import timer expired. Walking from 1 to 1
*Mar 24 13:40:42.764: %TCP-6-BADAUTH: Invalid MD5 digest from 10.250.250.2(11064) to 84.22.96.5(179)
Case 4 On Cisco ttl-security is enabled while on Forigate ebgp multi-hop is not .
There is no such thing as TTL security on the Fortigate by the way, all you can do to handle this state is enable ebgp-multihop and them it starts sending BGP packets with ttl = 255 .
Cisco:
Jan 7 13:01:36.992: %BGP-4-INCORRECT_TTL: Discarded message with TTL 2 from 10.250.250.2
Forigate:
BGP: 84.22.96.5-Outgoing [FSM] State: OpenConfirm Event: 11
BGP: 84.22.96.5-Outgoing [ENCODE] Msg-Hdr: Type 4
BGP: 84.22.96.5-Outgoing [ENCODE] Keepalive: 13548 KAlive msg(s) sent
84.22.96.5-Outgoing [FSM] State: OpenConfirm Event: 10
BGP: 84.22.96.5-Outgoing [ENCODE] Msg-Hdr: Type 3
BGP: %BGP-3-NOTIFICATION: sending to 84.22.96.5 4/0 (Hold Timer Expired/Unspecified Error Subcode) 0 data-bytes
BGP: 84.22.96.5-Outgoing [FSM] State: Idle Event: 3
BGP: 84.22.96.5-Outgoing [NETWORK] FD=14, Sock Status: 111-Connection refused
BGP: 84.22.96.5-Outgoing [FSM] State: Connect Event: 18
Bonus Case Bug-not-a-feature thing on the Fortigate – when configuring MD5 password for BGP authentication you get Cross-Site vulnerability protection for free 🙂 Don’t ask me how XSS is connected to cli configuration of BGP …
The string contains XSS vulnerability characters
value parse error before ”
Command fail. Return code -173