yurisk.info

Yuri Slobodyanyuk's blog on IT Security and Networking sharing experience and expertise

Category: Firewall (page 2 of 4)

Enabling antispam or antivirus on the Checkpoint gateway blocks smtp or http traffic

Recently I was unplesantly presented with “it is not a bug ,it is a feature” case with the Checkpoint .
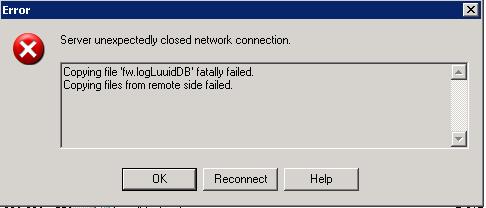
There was some UTM with TS (Total Security) valid license that includes antivirus and antispam services that client paid for and even asked to enable. So far so good. Part of the routine I checked on Gateway properties Antivirus and Antispam features , in Content inspection picked this UTM as enforcing Antispam/Antivirus policy , did install and .. got a call from the client that they can’t send/receive mails . In SmartView Tracker I saw the error of invalid license (it was the most clever disguise Checkpoint could come up with) , on command line fw monitor proved connections to port 25 arrive perfectly and pass pre/post insert points inbound but then nothing happens. Trying to telnet port 25 to the external ip of the mail server got me opened session , then connection was reset.
Only with the help of Checkpoint support (that actually were surprised that after all these years with their
product I haven’t seen this “feature” yet) did I find that issue is known one and caused by that to represent the mail server in LAN I created a MANUAL NAT rule . And ANY security server inside Checkpoint has to
know from security rules or from object properties its ip before and after NAT. Of course this info is
not to be located in any guides.
So to fix the situation you have to either :

  • replace manual NAT rules with automatic ones;
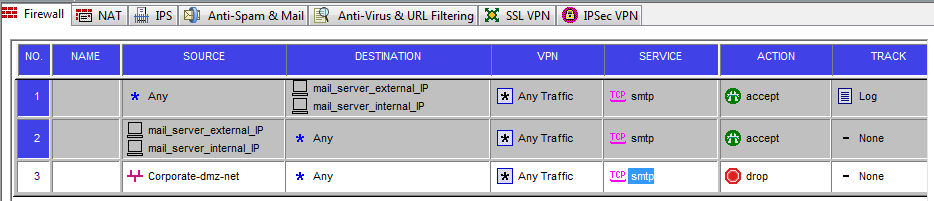
  • in security rules relevant to the server in question use BOTH internal and external IPs (that was
    what I did and it works ever since – see screenshot below).

I did the rules similar to this:
rulebase for SMTP server inside

NB there exist Secureknowledge base articles for it :
sk34862
sk32198

PS I talk here about SMTP but enabling Antivirus for the webserver in LAN with static NAT will have the same
devastating result.

Cisco ASA privilege separation for a local user or read only user on ASA

Today I had the need to create a user in ASA that would have read-only permissions and also could issue
only 2 commands: show run and show conn. Here is how to do it.
[showmyads]
We talk here about user with local authentication (with TACACS it is much easier).
Just as in Cisco routers you assign specific command to some privilege level different from its default level , then create user with this privilege level :

1) Assign command to specific privilege level ( I pick here level 3 , but it may be any but 15):

(config)# privilege show level 3 mode exec command running-config
(config)# privilege show level 3 mode exec command conn

2) create username with privilege of the command you want him to give
(config)# username Joedoe password asdlgfuwe privilege 3

Now you have 2 options – create general enable password for this given level (3 here) ,so
any user after successful login can enter > enable 3 and enter it to get to level 3 enable
mode. Or , as I did here, not creating enable level 3 password at all and the user will have to enter its
privilege level using login command.
3) now user can connect by ssh (if allowed by Ip of course) :
#ssh Joedoe@10.10.10.7
Joedoe@10.10.10.7password:<enter user’s pass here>
ASA> login
Username: Joedoe
Password: **********
# sh curpriv
Username : Joedoe
Current privilege level : 3
Current Mode/s : P_PRIV

Reference:
Cisco ASA Configuration Guide 8.0

Print rulebase in Checkpoint

The best place to hide something is to place it before your eyes. Thanks to theacademypro.com I discovered a cool feature of the SmartDashboard – ability to print rules directly from the Dashboard , you just go to File -> Print -> Rule Base.. and that’s it. Just amazing , I have been using Dashboards  throughout these years hundreds of times and never noticed it. Seems like you have to learn all your life to just return to the place you started from 🙂 .
Happy New Year All!

Checkpoint – back up centrally for recovery.

Backing up firewall configs for disaster recovery  is tedious and mundane task. And if you have enough firewalls doing it manually becomes impractical . To address this case I set up a highly secured server that periodically runs script backing up the clients’ firewalls.

I use here poll model – this central server connects by SSH to the remote firewalls ,issues upgrade_export command then downloads backup using SCP and finally deletes the backup from the firewall itself.
Advantage of such a schema as opposed to the push model where firewalls push backups to the central server I see in that:
 – I can secure this server much more as no remotely accessible services are running (so no remote exploit is possible)
 – I can have rule in firewall before this server Inbound – > Deny Any Any
 – I centrally manage the backup script , if something changes I fix just one script .
Disadvantage – password to enter the firewalls is stored clear text in the script.
Now to the script – I did it in Expect to make life easier , in short it just emulates interactive login by SSH, then runs upgrade_export command, downloads by SCP the backup file, also creating file with md5sum of the backup and downloading it as well. The final action is to login by SSH back and remove the backup file from the firewall.
Naming it does by adding current date to the IP of the firewall. No error checking is done.
 
Files used in script:
hosts  – file containing IPs of the firewalls to backup in the form <IP of firewall> one per line .

The script goes next (at the end you can download script as file to fix lines wrapping):

#!/usr/local/bin/expect
#set timeout to suffice for the largest backup file to download
set timeout 3000
 
#set password to enter the firewall
set password “password”
set username  “admin”
#set format for naming files
set timeand_date [clock format [clock seconds] -format %B-%Y-%m-%d]
#open hosts file that contains IPs of the firewalls and read it in a loop
set ff [open “hosts” r]
while {[gets $ff hostName] >= 0} {
 
 puts “Entering $hostName”
 spawn ssh -l $username $hostName
 expect {
        {[Pp]assword:} { send “$password\r” }
 “(yes*no)” { send “yes\r”
              expect {[Pp]assword:} {
 send “$password\r”
 }
}}
 
#increase timeout of SSH session
 expect {*#}  {
 send “TMOUT=900\r” }
 expect {*#}  {
 send “export TMOUT\r”}
#Create backup directory
 expect {*#}  {
 send “mkdir /var/Upgrade_export_backups\r”  }
 expect {*#}  {
 send “cd /var/Upgrade_export_backups\r”  }
#Issue the upgrade_export command
 expect {*#}  {
 send “\$FWDIR/bin/upgrade_tools/upgrade_export $timeand_date$hostName\r”  }
 expect {
{ready} {
 send “\r”      }
 {(y/n) [n]} {
 send “yes\r” }
}
#Calculate md5sum of the newly created backup file and save it to file
expect {*#} {
send “md5sum $timeand_date$hostName.tgz > $timeand_date$hostName.md5sum\r”}
 
expect {*#} {
  send “exit\r”}
  spawn  scp  $username@$hostName:/var/Upgrade_export_backups/\{$timeand_date$hostName.md5sum,$timeand_date$hostName.tgz\}    .
expect {
        {[Pp]assword:} { send “$password\r” }
}
 expect {#}   {
 #send “exit\r”
}
 
 spawn ssh -l $username $hostName
 expect {
        {[Pp]assword:} { send “$password\r” }
 “(yes*no)” { send “yes\r”
              expect {[Pp]assword:} {
 send “$password\r”
 }
}}
 
#remove created backup file
 expect {*#}  {
 send “cd /var/Upgrade_export_backups\r”  }
 expect {*#}  {
 send “rm -f $timeand_date$hostName.tgz\r”  }
 expect {*#}  {
 send “exit\r”  }
}
close $ff
 interact

Script as a file

Checkpoint winscp troubles

Checkpoint firewalls have 3 means of  transferring files in/out – ftp (client ) , SCP and SFTP (haven’t tried it yet) .
At some stage of the debug/upgrade process you will have to move files in either direction. The most secure is SCP protocol. On windows platforms picking the GUI SCP client is not hard – you only have WinSCP as your choice. And being otherwise  reliable and easy to use software it just doesn’t work with Checkpoint many times.  To fix this is easier than you can think of.

But first few prerequisites:

  To allow SCP connection to the firewall you have to :

       – create file named /etc/scpusers

       – add to it user per line – with which user you will be connecting for SCP session

       – make sure that for this user(s) shell is set to /bin/bash in /etc/passwd file

       – and of course allow SSH protocol connection from your host to the firewall.

After all the above done you connect using WinSCP, all goes well, try to download some file and …

Winscp fails when trying to download/upload some file from/to firewall

Error happens…
The easiest way (and the only one I found so far ) is to .. NOT use WinSCP but instead use wonderful
software PSCP from Putty author that doesn’t have GUI but works flawlessly with Checkpoint.
Download it here www.chiark.greenend.org.uk/~sgtatham , read instructions and have no regrets ever after.

ARP table overflow in Checkpoint and Linux in general

Not specific to the Checkpoint but rather any Linux-based system issue, still people often
forget  about that and look for the Checkpoint-specific solutions to that , so to help with  this search I wrote the note 
how  to fix it  below:
Problem  usually shows itself in randomly distributed inability of stations to pass the firewall, slowness and other network problems follow.
In /var/log/message you see the following record:

kernel: Neighbour table overflow.
That means ARP table has reached its maximum allowed limit and no new ARP entries are being learnt.

You can either find reason for sudden ARP requests influx or adjust ARP table limits accordingly.
You adjust ARP table limits either editing  this file (then change survives reboot):

/etc/sysctl.conf
If not present add these lines at the end, and try not to delete by mistake anything:
net.ipv4.neigh.default.gc_thresh1 = 1024
net.ipv4.neigh.default.gc_thresh2 = 4096
net.ipv4.neigh.default.gc_thresh3 = 16384

 – Then issue command:
  # sysctl -p
– Or if you want to increase it temporarily until reboot:
#echo 1024 > /proc/sys/net/ipv4/neigh/default/gc_thresh1
#echo 4096 > /proc/sys/net/ipv4/neigh/default/gc_thresh2
#echo 16384 > /proc/sys/net/ipv4/neigh/default/gc_thresh3

And the short explanation follows.
gc in the above means Garbage Collector (GC).
net.ipv4.neigh.default.gc_thresh1  – sets minimum number of ARP entries in the cache.
Until this value is reached GC doesnt run at all.
net.ipv4.neigh.default.gc_thresh2  – sets soft maximum number of ARP entries in the cache.
GC allows ARP cache to pass this limit for 5 seconds and then starts cleaning.
net.ipv4.neigh.default.gc_thresh3  –  sets hard limit of ARP entries in the cache.
After it is reached no more ARP entries are being added.

Increase and rotate SSH log files in Checkpoint

Log is knowledge (of who did what) and knowledge is power. All modern Operating Sytems today provide extensive logging facilities, and Linux on which Checkpoint products are based is no exception.
Checkpoint have own logging capabilities where logs are enabled in Security rulebase. And that’s fine, but SSHD daemon also has  logging and rotating feature which by default is limited to retain only last 4 logfiles.
I found it very useful to have ssh access logs for a longer period, especially when client also has access to the firewall and does changes on his/her own.
To tune parameters of the SSH logging edit /etc/cpshell/log_rotation.conf (no need to restart anything) :

# cat /etc/cpshell/log_rotation.conf
# File    max  size    backlog
# By default max size is 65536 bytes and backlog (how many files to rtain) is 4, I usually change it to the values before:
/var/log/messages 65536 256
/var/log/routing_messages 64536 256
/var/log/wtmp 65536 256
/var/log/lastlog 262400 256
/var/log/secure 64536 256
$CPDIR/log/cpstart.log 1048576 4
# Files after this line will not be shown by log command
/var/log/CPbackup.elg 64536 4
/var/CPbackup/log/backup_logs.elg 64536 4
$FWDIR/log/fwd.elg 1048576 4
$FWDIR/log/dtlsd.elg 1048576 4

< CUT here —————————– >

Older posts Newer posts

© 2016 yurisk.info

Theme by Anders NorenUp ↑