FortiADC Quick Start Guide with examples
- Introduction
- Initial Setup
- SLB Configuration
- Case 1: 2 HTTP port 80 real servers, Round-robin load balancing, HTTP Status healthcheck, Layer 7
- Case 2: Same servers as above, but in addition make vpn.yurisk.com available only in the hours 08:00-20:30 and make Health Checks check actual page on the web site
- Case 3: Same servers as above, but rewrite any Host header in the request to the correct one vpn.yurisk.com using Rewrite rule
- Case 4: 2 FTP servers, Round-robin load balancing, verify availability by downloading a file from the servers
- Case 5: 3 HTTP servers, 2 serving vpn.yurisk.com, and 1 serving oldvpn.yurisk.com at the same WAN IP of 10.100.102.123
- Debug and Verificaiton
Introduction
FortiADC (FAD) is a load balancer, either for incoming connecitons to the server farm, or outgoing connections to multiple ISPs. It comes in VM and appliance form. The modes of use are:
-
Server Load Balancing (SLB) - main use case. FAD sits between Internet and your server9s)/server farm and intercepts all incoming to the servers connections from remote clients (forward proxy), doing load balancing and various manipulations, then passing those connections further to the servers.
-
Link Load Balancing (LLB) - sits between LAN users and multiple ISP lines, load balancing outgoing from LAN to Internet connections between these ISP lines to provide bandwidth sharing, NAT, links usage optimization, cost optimization. In F5 it would be LTM.
-
Global Load Balancing (GLB) - used as an option with SLB. The FAD works as an authoritative DNS server for your domain zone(s), doing DNS resolving for clients on the Internet to a specific FAD out of many FADs in different physical locations.
Initial Setup
On first connect, FAD will present the 1st config Wizard, which can be skipped or used.
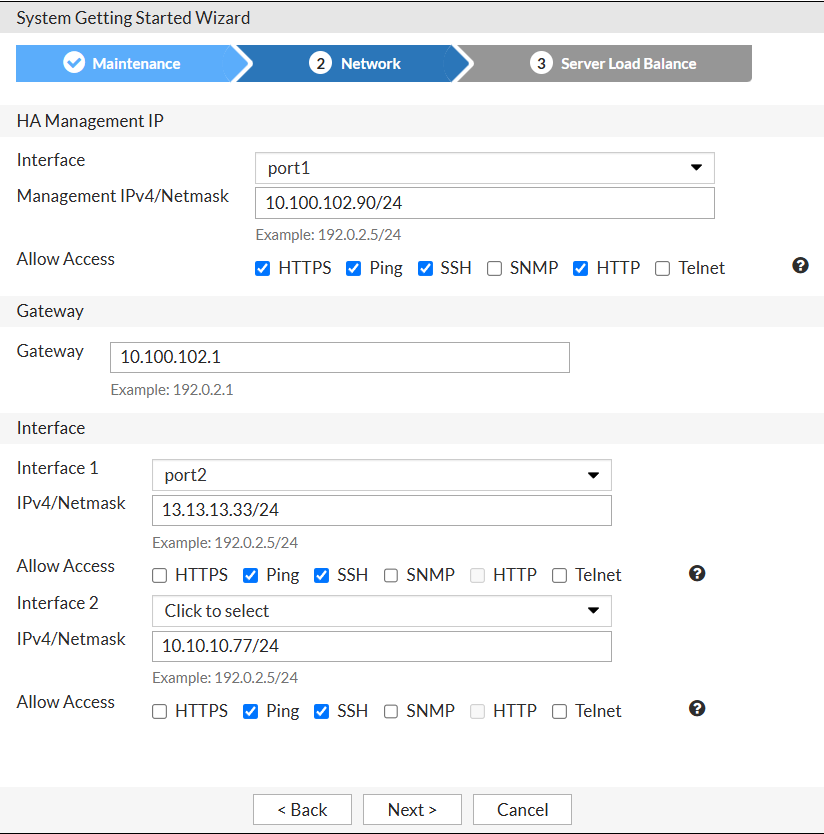
Just as Fortigate, FAD has local/remote admin accounts with access profiles, network interfaces with IPs (Network → Interface). All routing-related stuff goes to Network → Routing.
Admin access in FAD has 2 relevant configs: Trusted Host as usual per admin account, and Trust IP Address per interface. Source IP set per interface limits access of any admin account.
|
Note
|
I use the same interface (port1) for management and data traffic in this guide, but in production you should separate them as the best practice. |
SLB Configuration
The usual workflow:
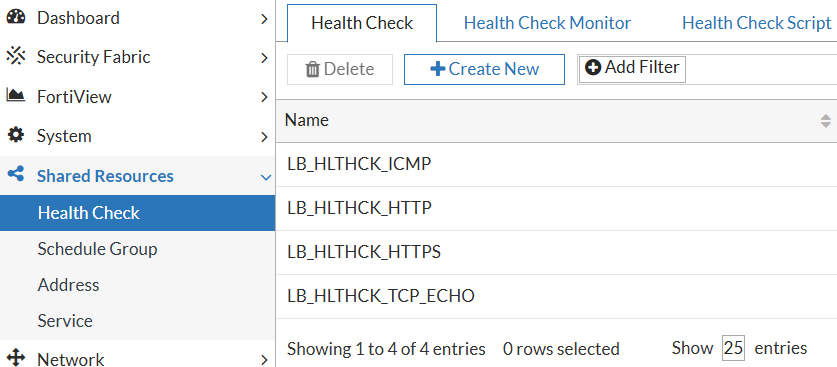
1) Configure custom Shared Resources or use the built-in. Mostly, you configure Health Checks here:
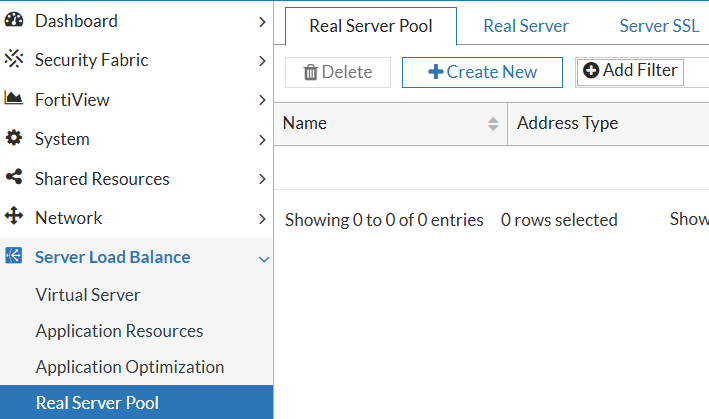
2) Configure Real Servers into server pool(s). I configure IPs, listening ports etc. of the real servers behind the FAD. You start creating a server pool, and inside it you create and add to the pool the real servers.
|
Note
|
In the whole workflow in FAD, it will show next steps in configuration only after you have saved the current step. Also, after creating some resource, you cannot change its name, only delete and re-create again. |
|
Note
|
Do not use dots in the resources names. |
3) Create Virtual Server combining all the above, also configuring (optionally) Content Rewriting, Content Routing, NAT Source Pool, Schedule Pool.

Case 1: 2 HTTP port 80 real servers, Round-robin load balancing, HTTP Status healthcheck, Layer 7
Topology for this and further cases until said otherwise is:
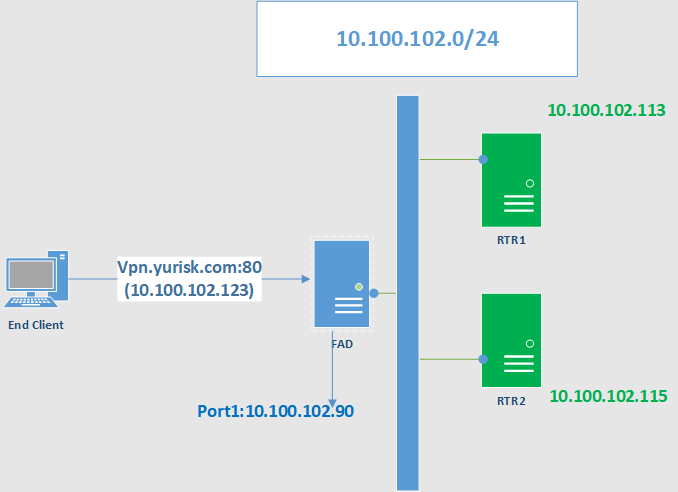
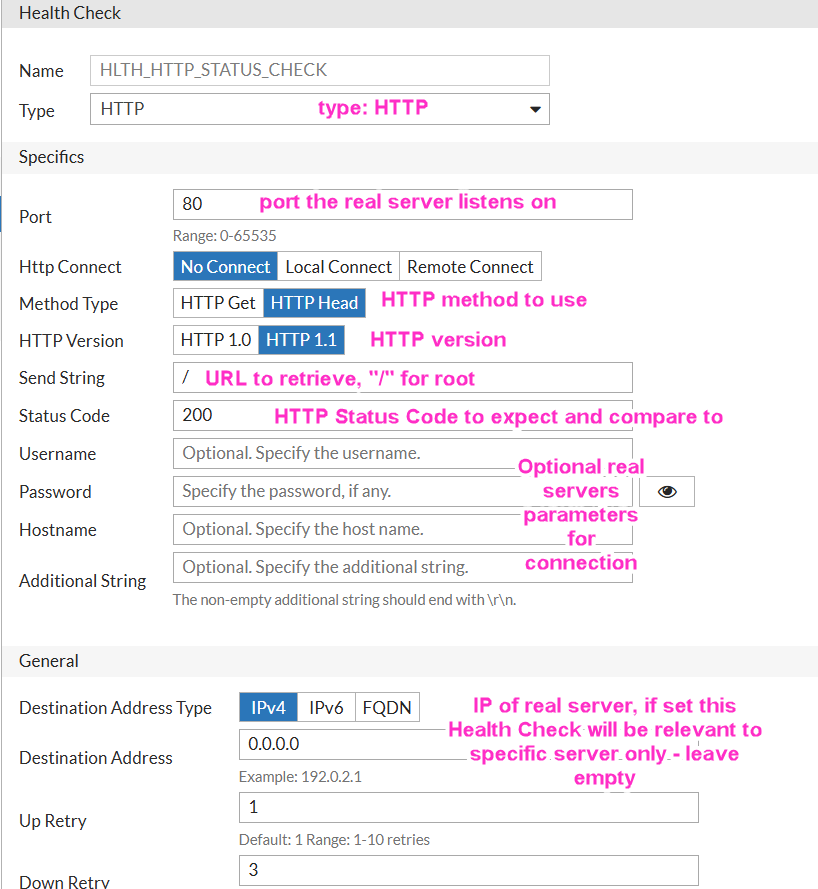
First are health checks. These will be HTTP real servers listening on port 80, so it is logical to check periodically connection to port 80 and issue HTTP HEAD command to get status as a reply, 200 (Success) being the expected one.
We do so in Shared Resources → Health Checks → New…
Next in Server Load Balance → Real Server Pool → Create New…

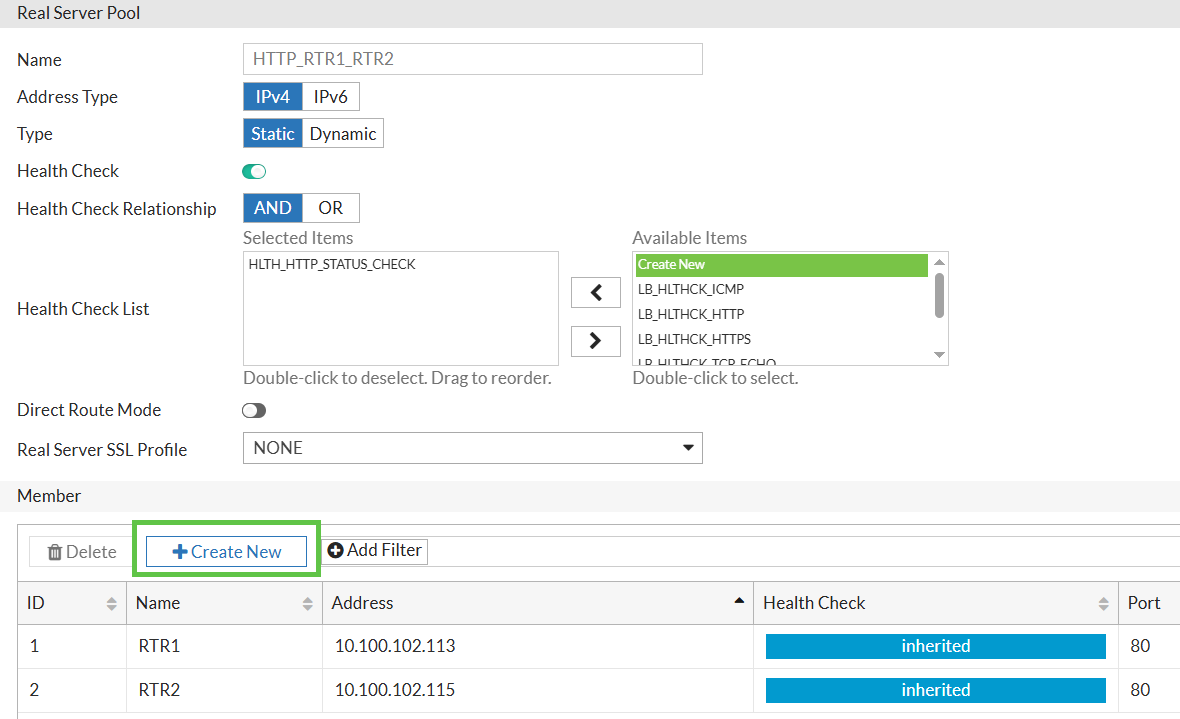
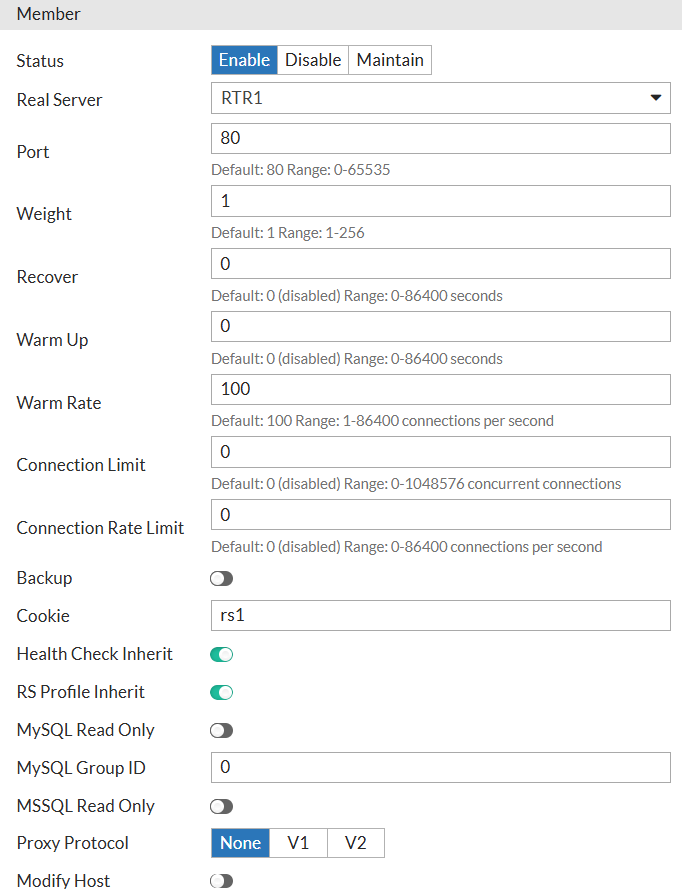
In new Real Server pool, we set IPv4, Static and Enable and the custom Health Check created above. After that we can add real servers, specifying for each its IP address, listening port, and leaving Health Check "Inherited" to be set for all real servers just once on the Real Server Pool level by clicking on member → Create New:
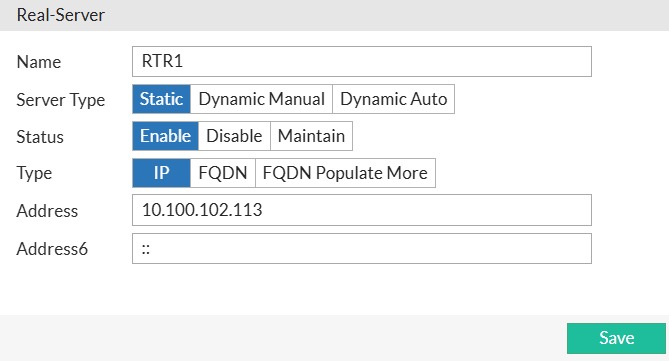
Example of settings for RTR1 real server:
The final step is Virtual Server to tie together all the configs done so far.
Server Load Balance → Create New → Basic/Advanced… the choice of Basic or Advanced is for initial wizard only, after the Virtual Server (vserver) has been created, editing it will have the same options. Here I pick Basic → HTTP:

Next, I set IP address for vserver - this is the IP seen by the end clients, and for which, for this case I created a domain record of vpn.yurisk.com that points to 10.100.102.123.
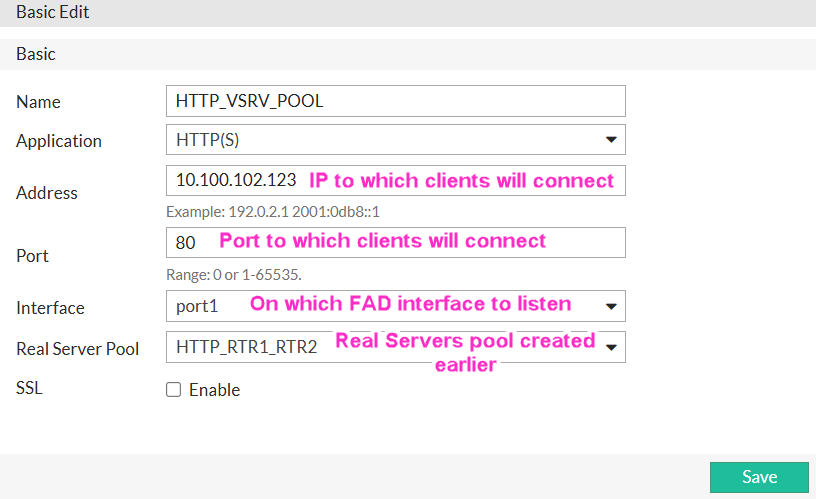
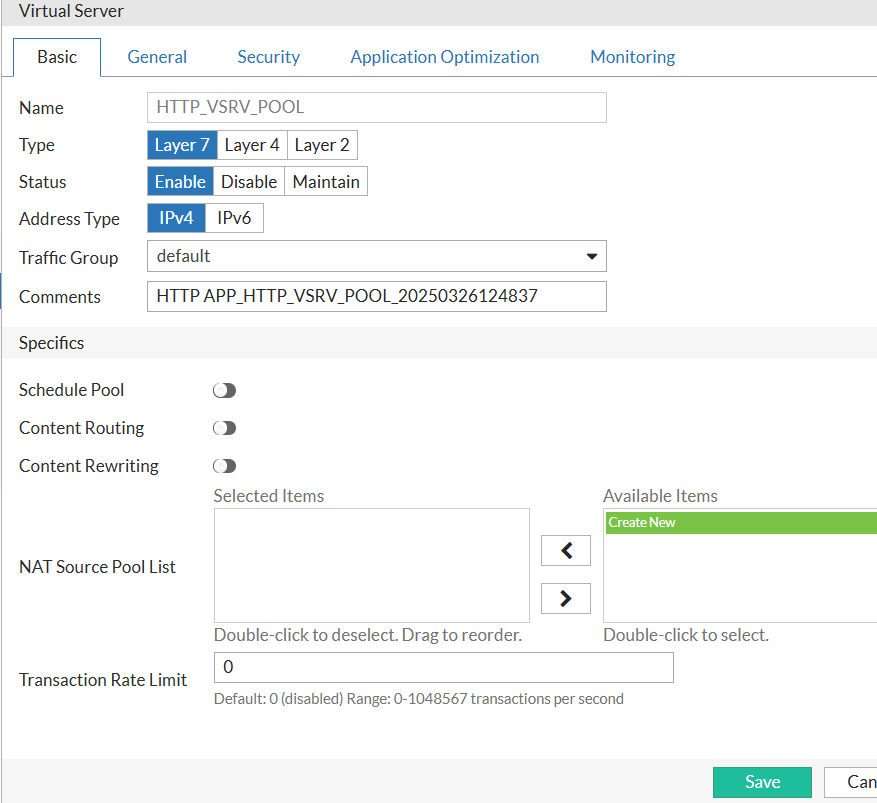
After saving, we got a whole lots of options 99% of which can be left on defaults:
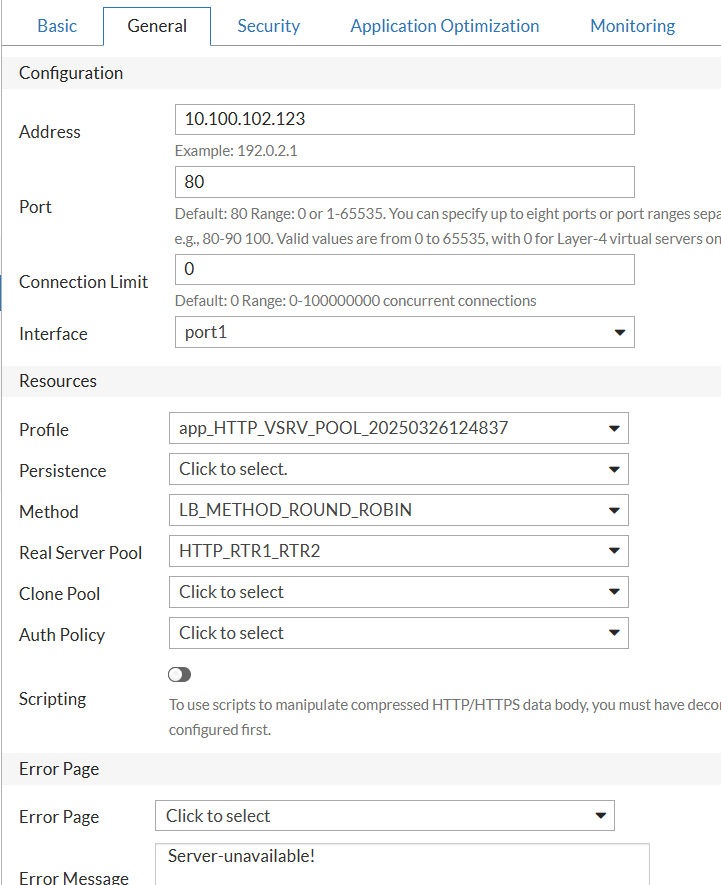
For this case, I will only pick the built-in Round-robin for the balancing method:
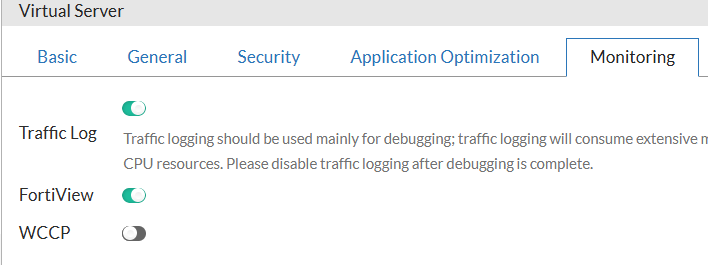
And will enable Traffic Logs for this vserver, be careful if doing this on production server as may overload the FAD with extensive logging:
Whole configuration on CLI
config router static
  edit 1
    set gateway 10.100.102.1
  next
end
config system health-check
  edit "HLTH_HTTP_STATUS_CHECK"
    set type http
    set port 80
  next
end
config load-balance real-server
  edit "RTR1"
    set ip 10.100.102.113
  next
  edit "RTR2"
    set ip 10.100.102.115
  next
end
config load-balance pool
  edit "HTTP_RTR1_RTR2"
    set health-check-ctrl enable
    set health-check-list HLTH_HTTP_STATUS_CHECK
    set real-server-ssl-profile NONE
    config  pool_member
      edit 1
        set pool_member_cookie rs1
        set real-server RTR1
      next
      edit 2
        set pool_member_cookie rs2
        set real-server RTR2
      next
    end
  next
end
config load-balance method
  edit "app_HTTP_VSRV_POOL_20250326124837"
  next
end
config load-balance virtual-server
  edit "HTTP_VSRV_POOL"
    set type l7-load-balance
    set interface port1
    set ip 10.100.102.123
    set load-balance-profile app_HTTP_VSRV_POOL_20250326124837
    set load-balance-method LB_METHOD_ROUND_ROBIN
    set load-balance-pool HTTP_RTR1_RTR2
    set traffic-log enable
    set comments "HTTP APP_HTTP_VSRV_POOL_20250326124837"
    set traffic-group default
    set fortiview enable
  next
end
Verifying
On end client PC, trying vpn.yurisk.com in the browser gets me once to RTR1, once to RTR2 after few refreshes:

On the RTR2 server side, end client connection is seen with the source IP of 10.100.102.90 - IP set on port1 of the FAD and which FAD is using according to the route table when proxying incoming connection to the real server RTR2. The end client IP is 10.100.102.19 but real server does not see it:
rtr2# netstat -an -p tcp
Active Internet connections (including servers)
Proto   Recv-Q Send-Q  Local Address          Foreign Address        TCP-State
tcp          0      0  10.100.102.115.80      10.100.102.90.47532    ESTABLISHED
On the real server RTR1, the sniffer shows health checks done by FAD - HEAD on port 80:
20:12:05.470475 10.100.102.90.50160 > 10.100.102.113.80

0000: 4500 00ae be30 4000 4006 9a86 0a64 665a  E....0@.@....dfZ
  0010: 0a64 6671 c3f0 0050 2ec8 db66 ad42 8fa2  .dfq...P...f.B..
  0020: 8018 003a 5fba 0000 0101 080a 5ca2 7cee  ...:_.......\.|.
  0030: f9eb 6437 4845 4144 202f 2048 5454 502f  ..HEAD / HTTP/
  0040: 312e 310d 0a55 7365 722d 4167 656e 743a  1.1..User-Agent:
  0050: 204b 6565 7041 6c69 7665 436c 6965 6e74   KeepAliveClient
  0060: 0d0a 4361 6368                           ..Cach
FAD is using strangely named User-Agent of KeepAliveClient.
Case 2: Same servers as above, but in addition make vpn.yurisk.com available only in the hours 08:00-20:30 and make Health Checks check actual page on the web site
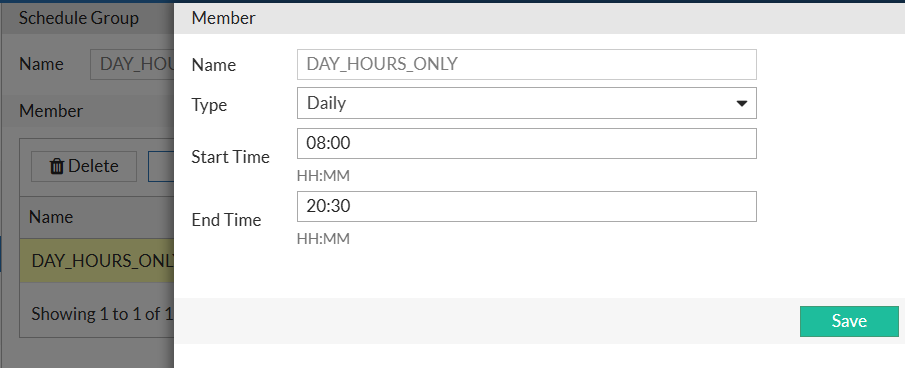
When you hear time limitation - think Schedule, just as in Fortigate. So let’s create a schedule for 08:00-20:30.
Shared Resources → Schedule Group → New … After saving (basically just name) Schedule Group, you can add Member(s) - actual schedule(s).
I call the group DAY_HOURS, and inside it create a schedule named DAYS_HOURS_ONLY:
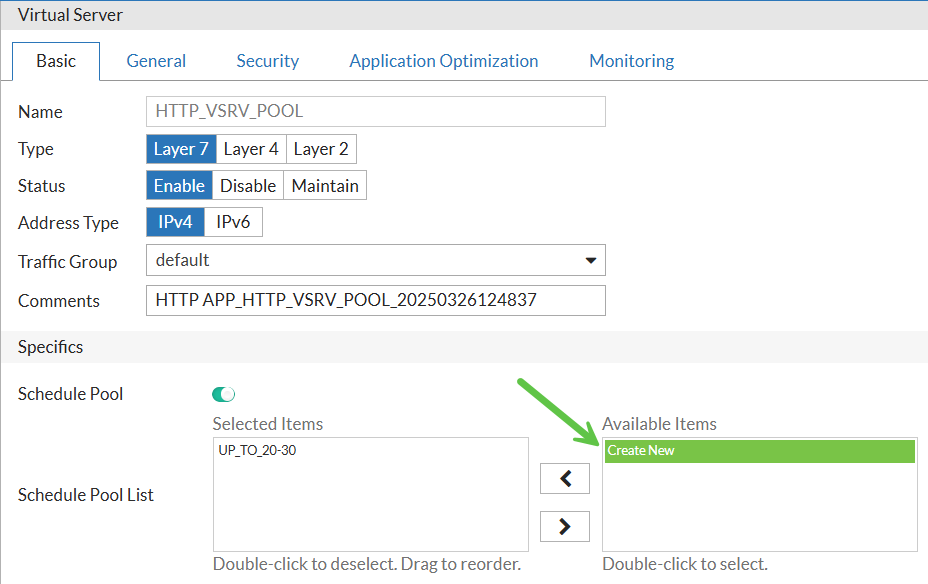
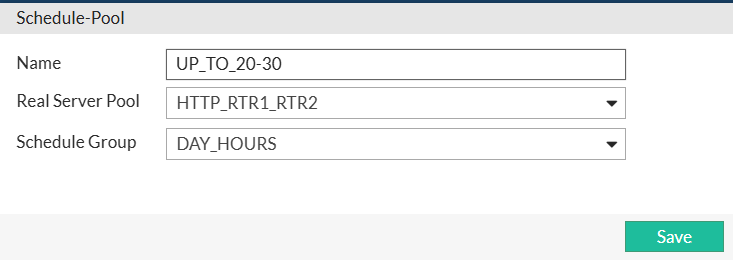
I go then to the vserver I created earlier, click on Edit and enable Schedule Pool, after which I double click on "Create New" and create new Schedule Pool named UP_TO_20-30 combining real servers pool with schedule group:
CLI configuration (only changes from above):
config system schedule-group
  edit "DAY_HOURS"
    config  schedule-member
      edit "DAY_HOURS_ONLY"
        set type daily-recurring
        set starttime-of-startdate 08:00
        set endtime-of-enddate 20:30
      next
    end
  next
end
config load-balance virtual-server
  edit "HTTP_VSRV_POOL"
    set type l7-load-balance
    set interface port1
    set ip 10.100.102.123
    set load-balance-profile app_HTTP_VSRV_POOL_20250326124837
    set schedule-list enable  <-- ENABLE SCHEDULE
    set load-balance-method LB_METHOD_ROUND_ROBIN
    set schedule-pool-list UP_TO_20-30 <-- SET SCHEDULE GROUP
    set traffic-log enable
    set comments "HTTP APP_HTTP_VSRV_POOL_20250326124837"
    set traffic-group default
    set fortiview enable
  next
end
Verification. After the clock reaches 20:31 I try to enter the vpn.yurisk.com and instead of real server page, see the default error message:

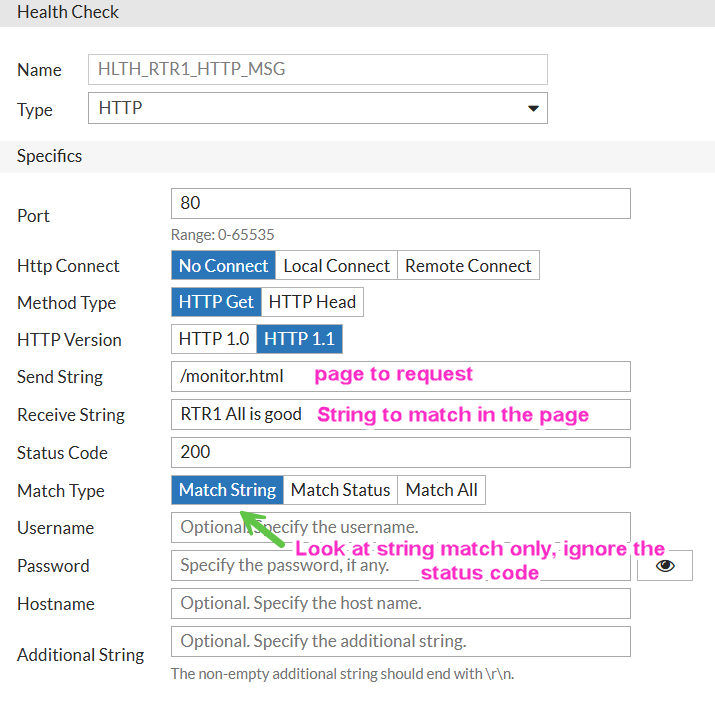
Regarding the actual contents of a web page check - I created in each real server the page named monitor.html which is actually a text file that contains: on RTR1 the phrase "RTR1 All is good" and on RTR2 "RTR2 All is good". Then I configure 2 health checks for each router, as each router will present a different string in the page to match (for demonstration purposes only - I could put the same string to match in both servers' pages and then would only need 1 health check of both).
Health Check for RTR1:
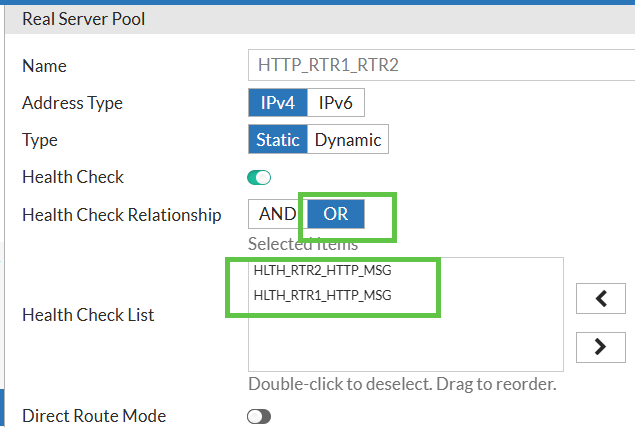
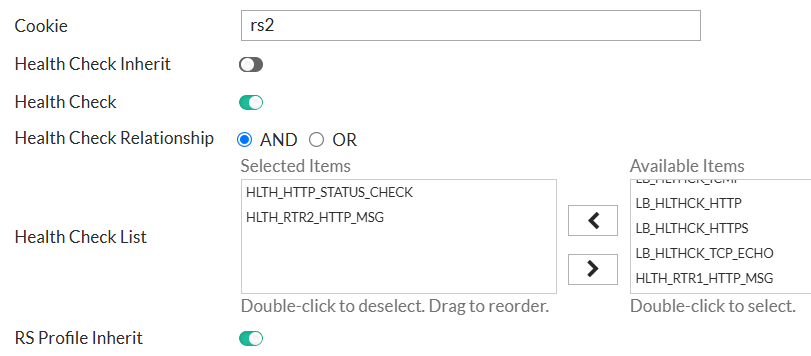
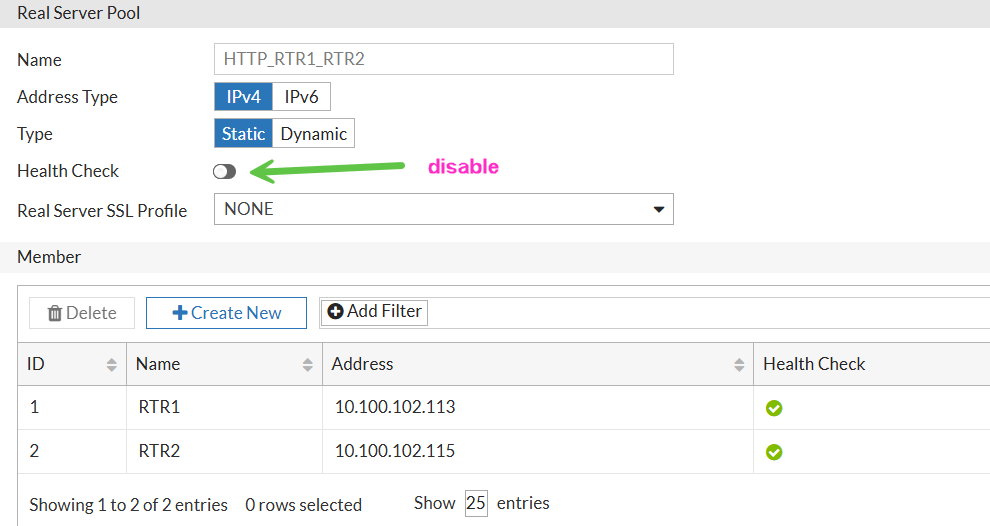
Using the health checks in the Real Server Pool - we have 2 options here, either put both checks at the pool level and change their Relationship from AND to OR, i.e. it will be enough for any of 2 checks to be successful. Or, more orderly, remove health check at pool level, and set them individually at each server level. I will do the 2nd option.
The 1st option - setting health check on Real Server Pool level would look like that:
For the set up I want, I will edit each real server under real servers pool, here is RTR1:
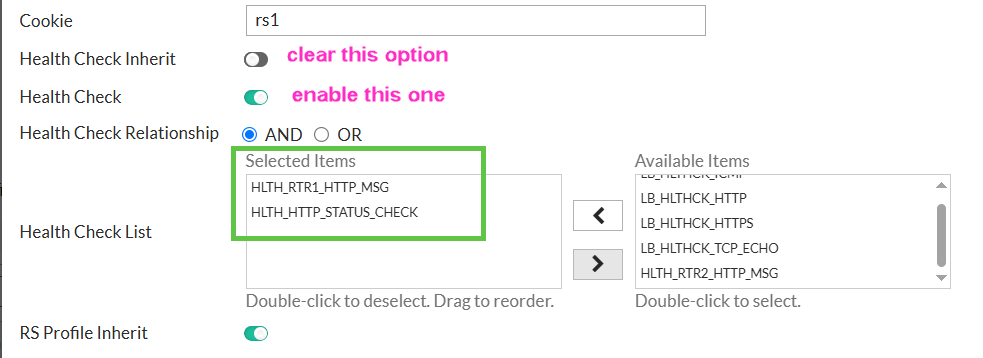
As you can see, I added 2 health checks - one checks contents of the returned page, second one checks that status is 200 (OK), even though I could check status inside the 1st, page checking monitor.
I do the same for the RTR2:
And will remove the health check at the real server pool level:
CLI Configuration (only changes):
config system health-check
  edit "HLTH_HTTP_STATUS_CHECK"
    set type http
    set port 80
  next
  edit "HLTH_RTR1_HTTP_MSG"
    set type http
    set port 80
    set method-type http_get
    set send-string /monitor.html
    set receive-string "RTR1 All is good"
  next
  edit "HLTH_RTR2_HTTP_MSG"
    set type http
    set port 80
    set method-type http_get
    set send-string /monitor.html
    set receive-string "RTR2 All is good"
    set match-type match_all
  next
end
config load-balance pool
  edit "HTTP_RTR1_RTR2"
    set health-check-list HLTH_RTR2_HTTP_MSG HLTH_RTR1_HTTP_MSG
    set real-server-ssl-profile NONE
    config  pool_member
      edit 1
        set health-check-inherit disable
        set health-check-ctrl enable
        set health-check-list HLTH_RTR1_HTTP_MSG HLTH_HTTP_STATUS_CHECK
        set pool_member_cookie rs1
        set real-server RTR1
      next
      edit 2
        set health-check-inherit disable
        set health-check-ctrl enable
        set health-check-list HLTH_HTTP_STATUS_CHECK HLTH_RTR2_HTTP_MSG
        set pool_member_cookie rs2
        set real-server RTR2
      next
    end
  next
end
For verification I will shut down RTR1, the health checks changes to warning and RTR1 is removed from active servers:

Case 3: Same servers as above, but rewrite any Host header in the request to the correct one vpn.yurisk.com using Rewrite rule
When switching old subdomains to new locations, you usually set up a DNS redirect via a CNAME record to point to the new name/location. However, the client’s browser will still be using the old Host header. For example, if you had oldvpn.yurisk.com hosting your website and moved it to vpn.yurisk.com, browsers with oldvpn.yurisk.com configured will continue sending oldvpn.yurisk.com as the Host header value even to the new location. And if the new webserver does not recognize this domain, it will return an Error 404 "Not Found".
To prevent this, we can create Content Rewriting (applicable to HTTP only) rule for all incoming HTTP requests for their Host header to be re-written to the correct vpn.yurisk.com in each client’s request.
You do so in the Server Load Balance → Virtual Server → Content Rewriting → New… by creating a new Rewrite rule(s), and then attaching it inside the Virtual Server config. The matching can be either string or regex, I will use regex here that will match any value of Host header:
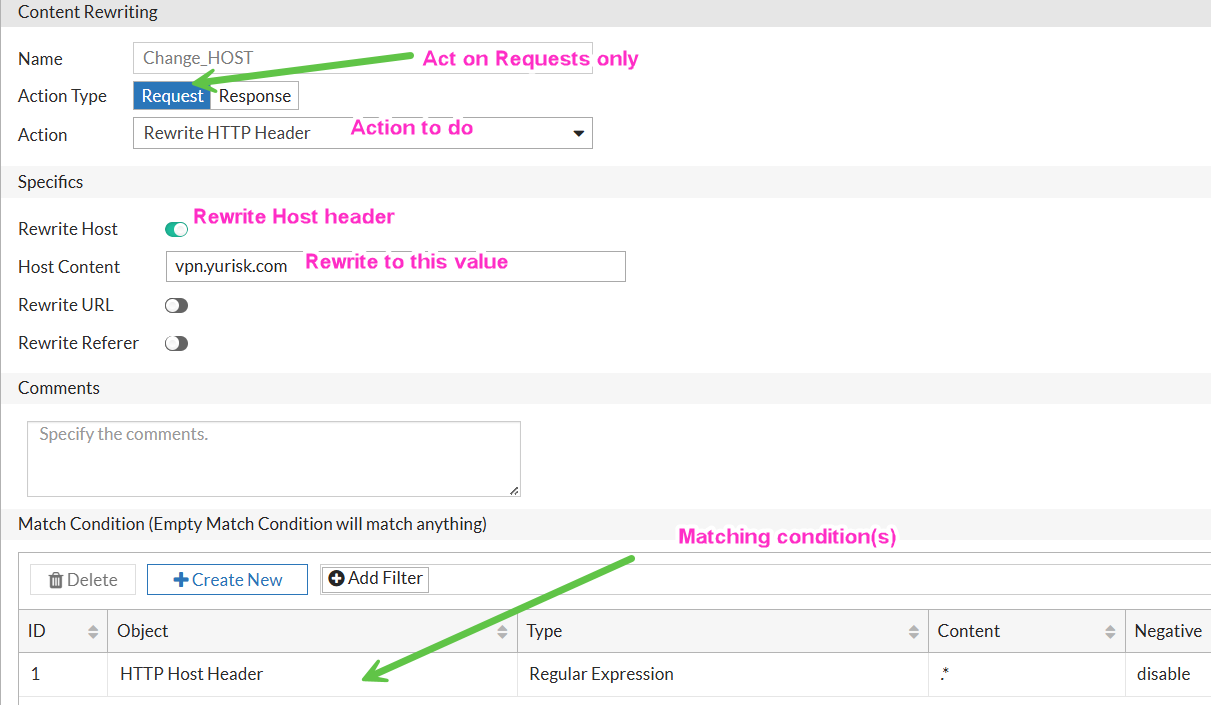
Now attach it to the vserver:
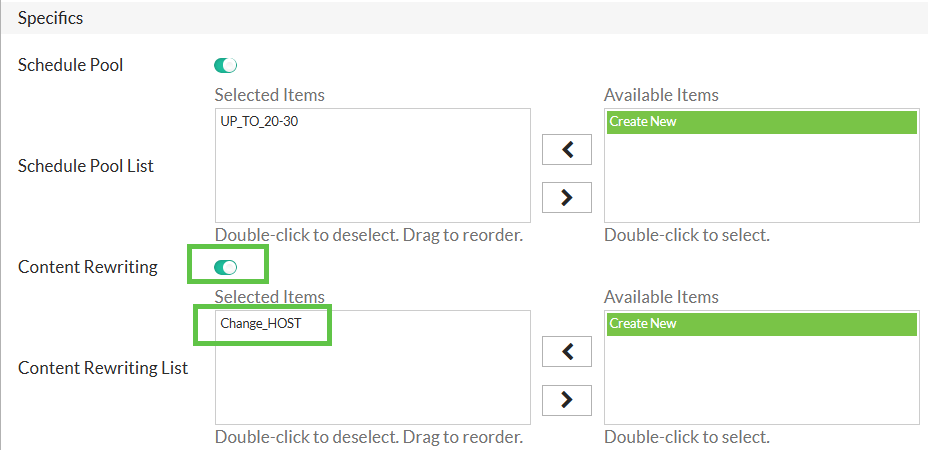
CLI Configuration.
config load-balance content-rewriting
  edit "Change_HOST"
    set action rewrite_http_header
    set host-status enable
    set host vpn.yurisk.com
    config  match-condition
      edit 1
        set type regular-expression
        set content .*
      next
    end
  next
end
config load-balance virtual-server
  edit "HTTP_VSRV_POOL"
    set type l7-load-balance
    set interface port1
    set ip 10.100.102.123
    set load-balance-profile LB_PROF_HTTP
    set content-rewriting enable
    set content-rewriting-list Change_HOST <-- THE RULE
    set schedule-list enable
    set load-balance-method LB_METHOD_ROUND_ROBIN
    set schedule-pool-list UP_TO_20-30
    set traffic-log enable
    set comments "HTTP APP_HTTP_VSRV_POOL_20250326124837"
    set traffic-group default
    set fortiview enable
  next
end
Verification Doing sniffer on FAD, I can see that HTTP request comes from end client for the Host of oldvpn.yurisk.com but then is replaced with vpn.yurisk.com when exits the FAD to the real server (RTR2 here). Client IP is 10.100.102.5:
port1 in 10.100.102.5.59364 -> 10.100.102.123.80

..GET./.HTTP/1.1
..Host:.oldvpn.yurisk.com.. <-- ORIGINAL
Upgrade-Insecure-Requests:.1..Accept:
.text/html,application/xhtml+xml
,application/xml;q=0.9,*/*;q=0.8
..User-Agent:.Mozilla/5.0.(Macin
tosh;.Intel.Mac.OS.X.10_15_7).Ap
pleWebKit/605.1.15.(KHTML,.like.
Gecko).Version
port1 out 10.100.102.90.34082 -> 10.100.102.115.80

.+GET./.HTTP/1.1
..Host:.vpn.yurisk.com.. <-- REWRITTEN HOST
Upgrade-Insecure-Request
s:.1..Accept:.text/html,applicat
ion/xhtml+xml,application/xml;q=
0.9,*/*;q=0.8..User-Agent:.Mozil
la/5.0.(Macintosh;.Intel.Mac.OS.
X.10_15_7).AppleWebKit/605.1.15.
(KHTML,.like.Gecko).Version/17
Case 4: 2 FTP servers, Round-robin load balancing, verify availability by downloading a file from the servers
The finished logical diagram will be seen in FortiView → Logical Topology:

I’ll start the same way as with HTTP - create Health Check for FTP.
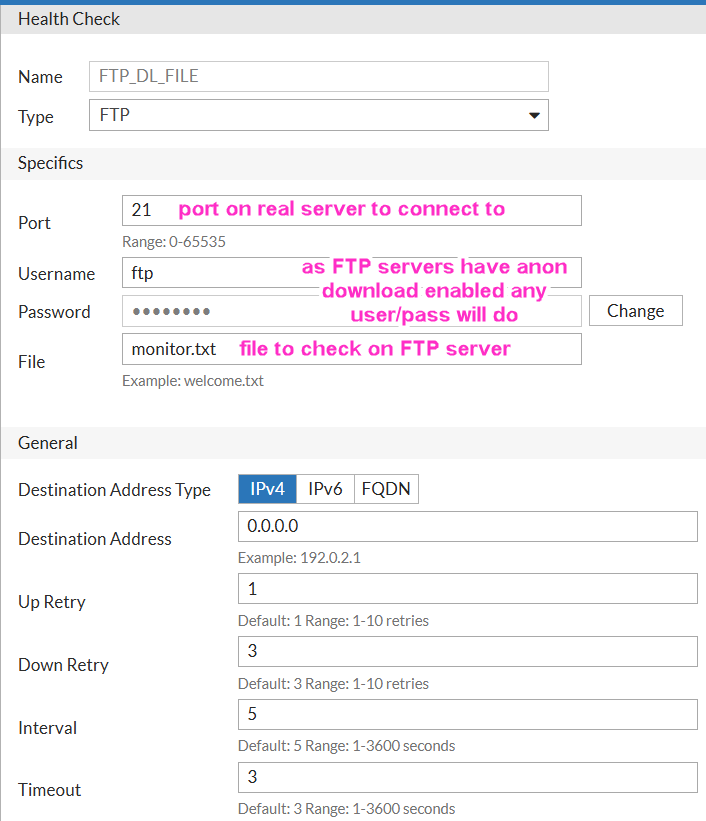
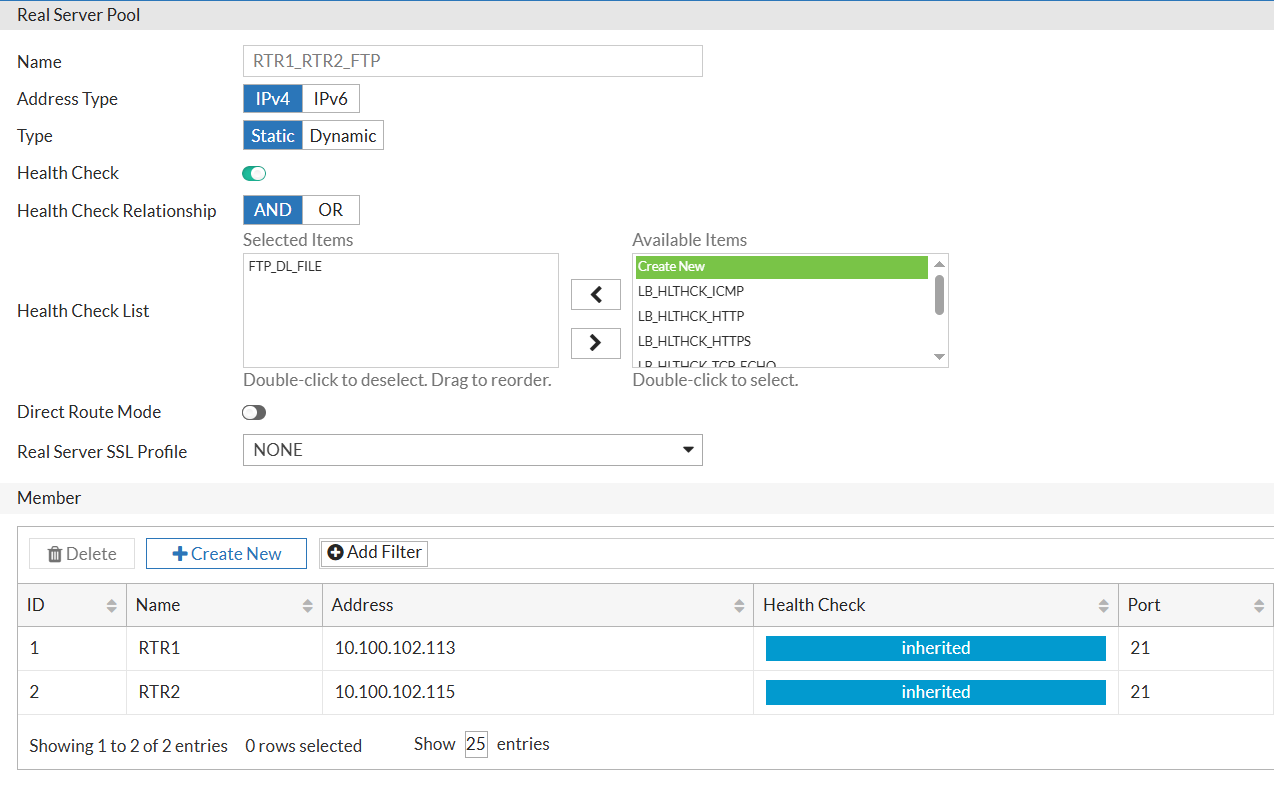
Then I create a Real Server Pool with 2 FTP servers, and add the Health Check to it.
Here, RTR1 - 10.100.102.113, RTR2 - 10.100.102.115. I will use the same Health Check for both servers, as file name to check monitor.txt is the same on both servers. I will use the default FTP port 21.
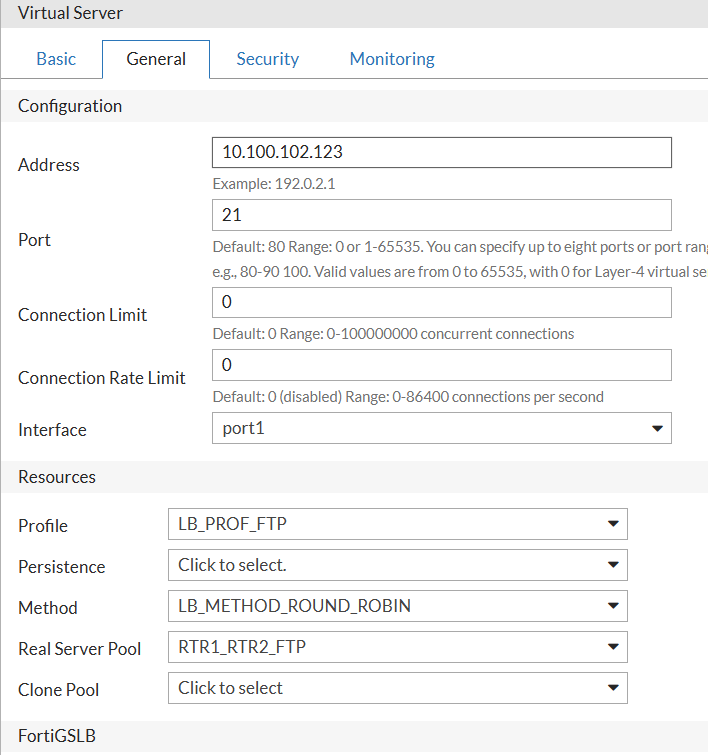
And, finally, the Virtual Server. It will be different from the HTTP one in that I will create Layer 4 vserver, as FortiADC only supports Layer 7 for HTTP and HTTPS. I will use the default FTP port 21, and will set the load balancing method to Round Robin. Also, I will have to create and use Full NAT as forwarding method, as Layer 4 vserver does not act as full Layer 7 proxy, and does not change the source IP of the client to the FAD IP. This is important for FTP, as FTP uses 2 connections - control and data, and the data connection is opened by the server to the client, so if the client IP is not changed to FAD IP, the server will try to connect back to the client IP directly, bypassing the FAD, which will not work.
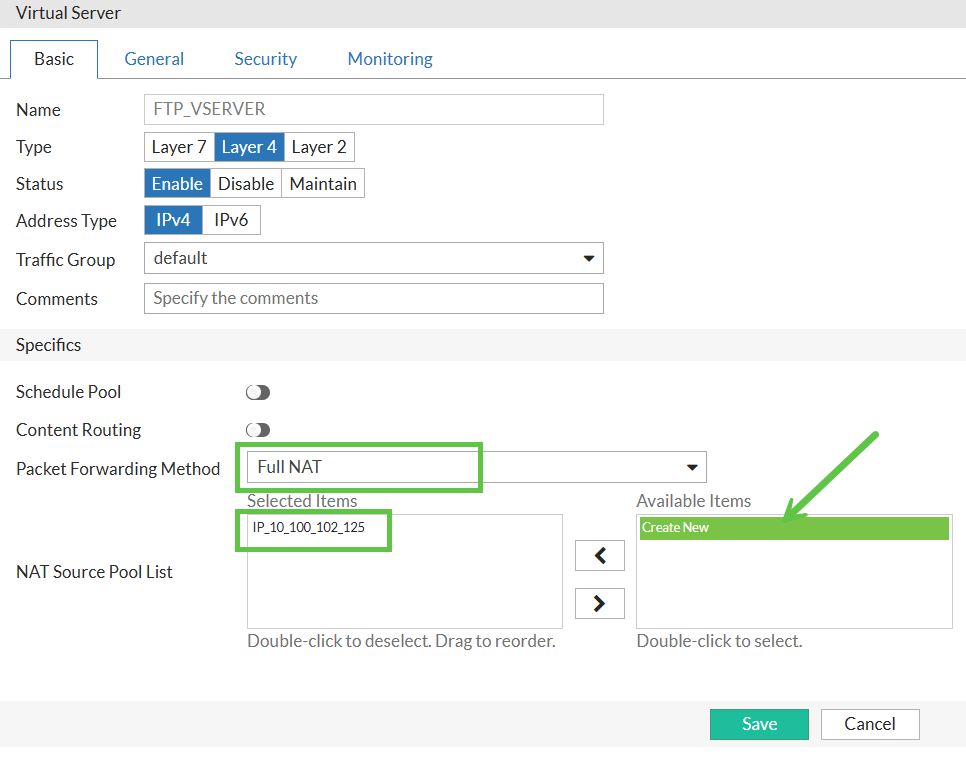
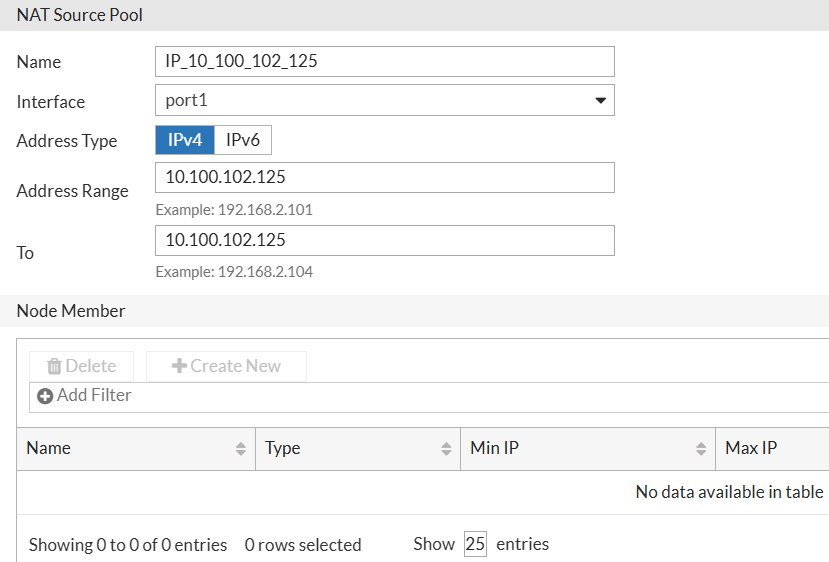
NAT Source Pool used in Vserver:
In General properties I set the Round-robin algo:
-
CLI Configuration
config system health-check
  edit "FTP_DL_FILE"
    set type ftp
    set port 21
    set username ftp
    set password ENC rhwXABt
    set file monitor.txt
  next
end
config load-balance ippool
  edit "IP_10_100_102_125"
    set interface port1
    set ip-min 10.100.102.125
    set ip-max 10.100.102.125
    config  node-member
    end
  next
end
config load-balance real-server
  edit "RTR1"
    set ip 10.100.102.113
  next
  edit "RTR2"
    set ip 10.100.102.115
  next
end
config load-balance pool
  edit "RTR1_RTR2_FTP"
    set health-check-ctrl enable
    set health-check-list FTP_DL_FILE
    set real-server-ssl-profile NONE
    config  pool_member
      edit 1
        set pool_member_service_port 21
        set pool_member_cookie rs1
        set real-server RTR1
      next
      edit 2
        set pool_member_service_port 21
        set pool_member_cookie rs2
        set real-server RTR2
      next
    end
  next
end
config load-balance virtual-server
  edit "FTP_VSERVER"
    set packet-forwarding-method FullNAT
    set interface port1
    set ip 10.100.102.123
    set port 21
    set load-balance-profile LB_PROF_FTP
    set load-balance-method LB_METHOD_ROUND_ROBIN
    set load-balance-pool RTR1_RTR2_FTP
    set ippool-list IP_10_100_102_125
    set traffic-group default
  next
end
Verification The active connecitons can be seen in FortiView → All Sessions:

Here, the client to FTP connection is to port 21, and FTP server to client data transfer connection is sourced from port 20 on the server.
Case 5: 3 HTTP servers, 2 serving vpn.yurisk.com, and 1 serving oldvpn.yurisk.com at the same WAN IP of 10.100.102.123
When serving multiple domains on the same WAN IP (here 10.100.102.123) but using different real servers for each domain, FortiADC’s Content Routing will be the one to use. It routes requests to real servers based on Layer 4 or Layer 7 info. For subdomains, Layer 7 is used to route based on the Host header. Thus, oldvpn.yurisk.com is routed to RTR3 (10.100.102.117), while vpn.yurisk.com is routed to RTR1 and RTR2.
The finished Logical Topology can be seen in FortiView → Logical Topology:

-
Create Health Check. I will use created earlier
HLTH_HTTP_STATUS_CHECKfor all 3 servers, as it is checking the status of the server by issuing HTTP HEAD command to port 80. -
Create all Real Servers. I already have RTR1 & RTR2 from previous cases serving subdomain
vpn.yurisk.com, now I will add RTR3 the same way as the previous 2 to serveoldvpn.yurisk.com.
The final table or Real Servers will look:

-
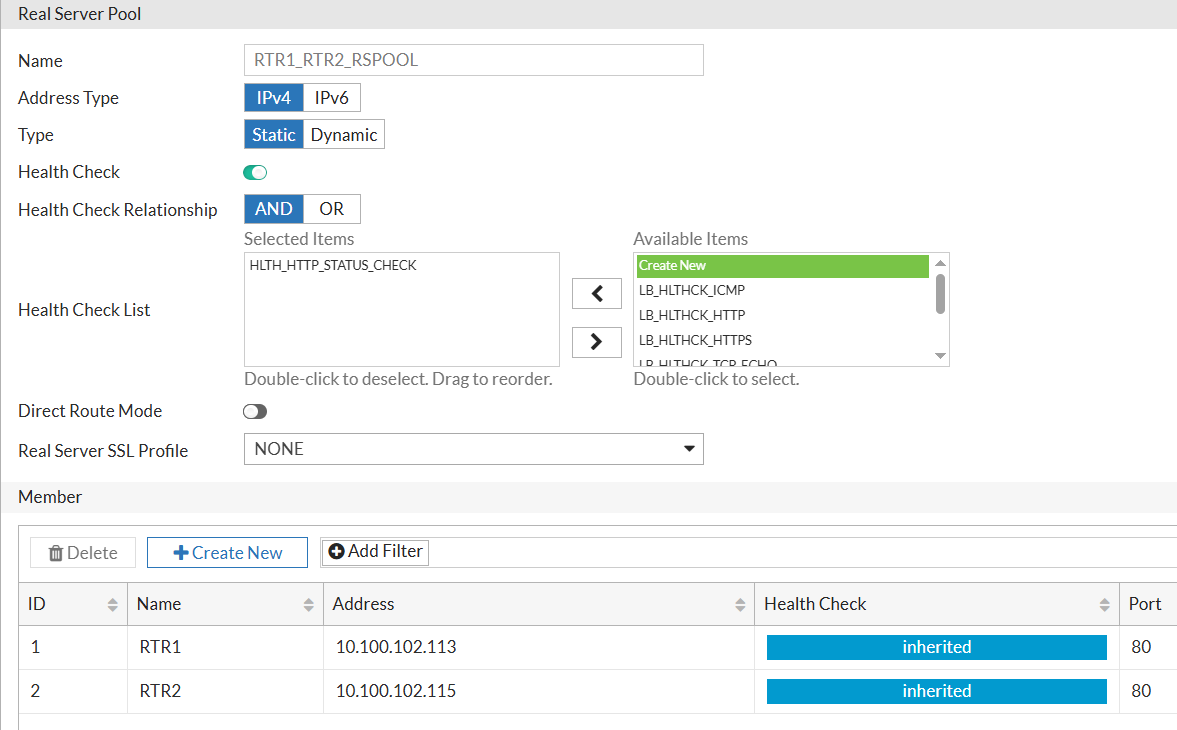
Create Real Servers Pool. I will create 3 pools - one for RTR1 and RTR2, one for RTR3, and one including all 3 servers. The first pool will be used for
vpn.yurisk.com, the second foroldvpn.yurisk.com, and the third one will be the fallback, used for all 3 servers in case of failure.
RTR1 & RTR2 Pool:
RTR3 Pool:
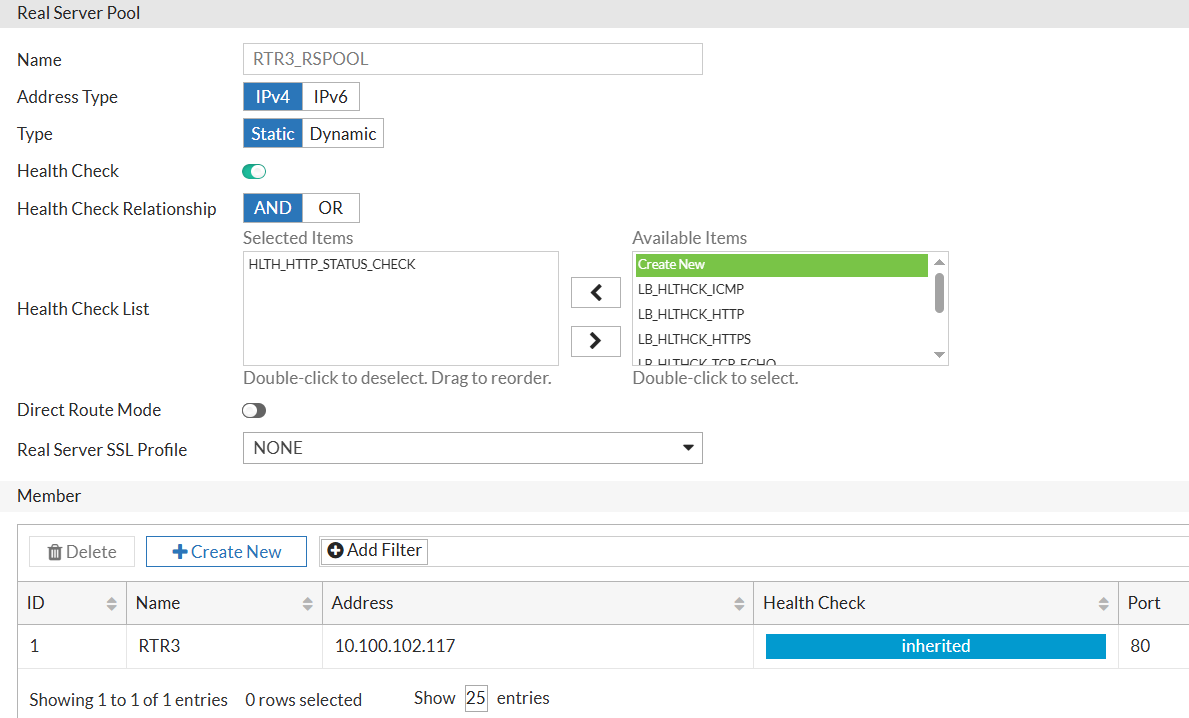
RTR1, RTR2, and RTR3 Pool (will be assigned at Vserver level, will be used if the first 2 pools fail):
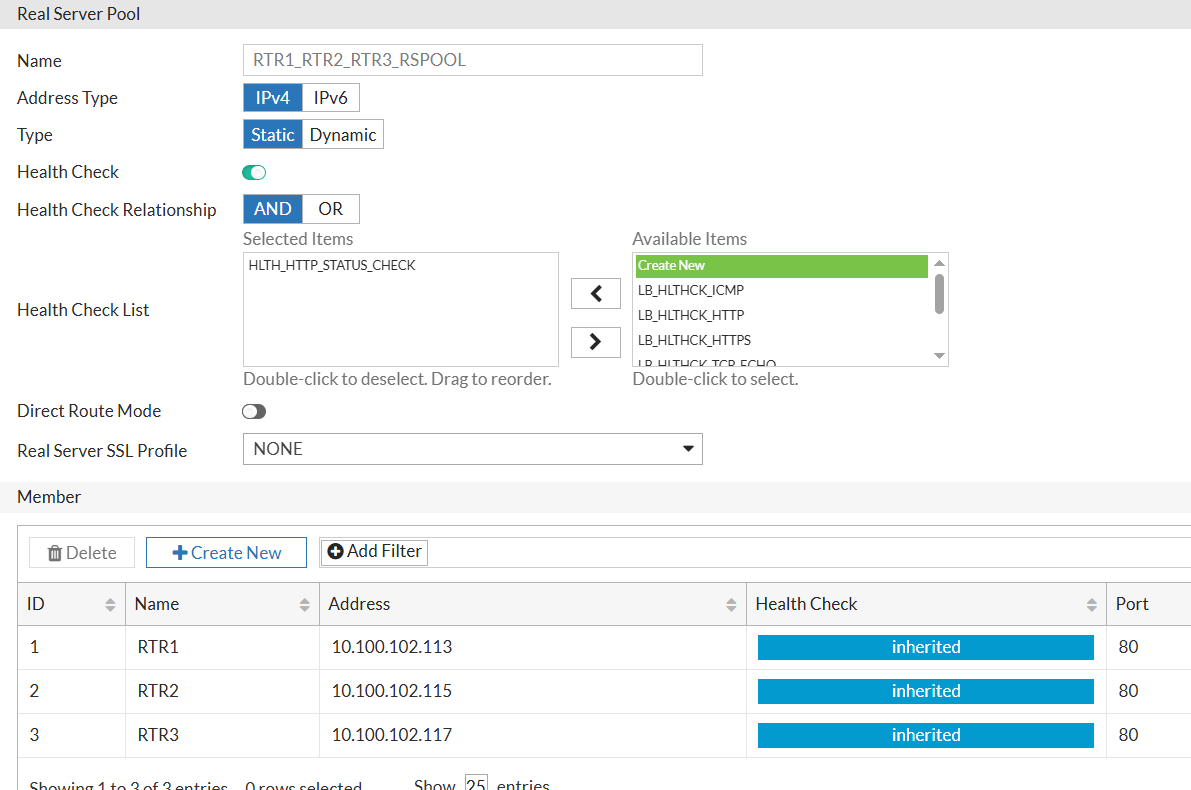
Final look of all Real Servers Pools:

-
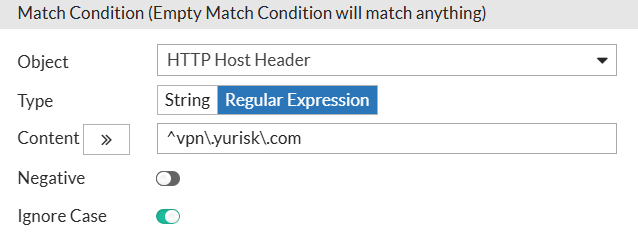
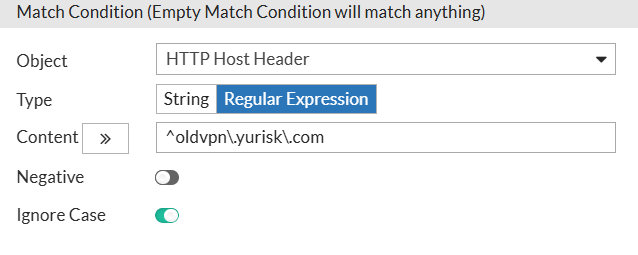
Now, the main part - create Content Routing rules. I will create 2 rules - one for
vpn.yurisk.comand one foroldvpn.yurisk.com. The first rule will match the Host header ofvpn.yurisk.comand route it to the RTR1 & RTR2 pool, while the second rule will match the Host header ofoldvpn.yurisk.comand route it to the RTR3 pool.
Rule for vpn.yurisk.com matching the Host header via regex:
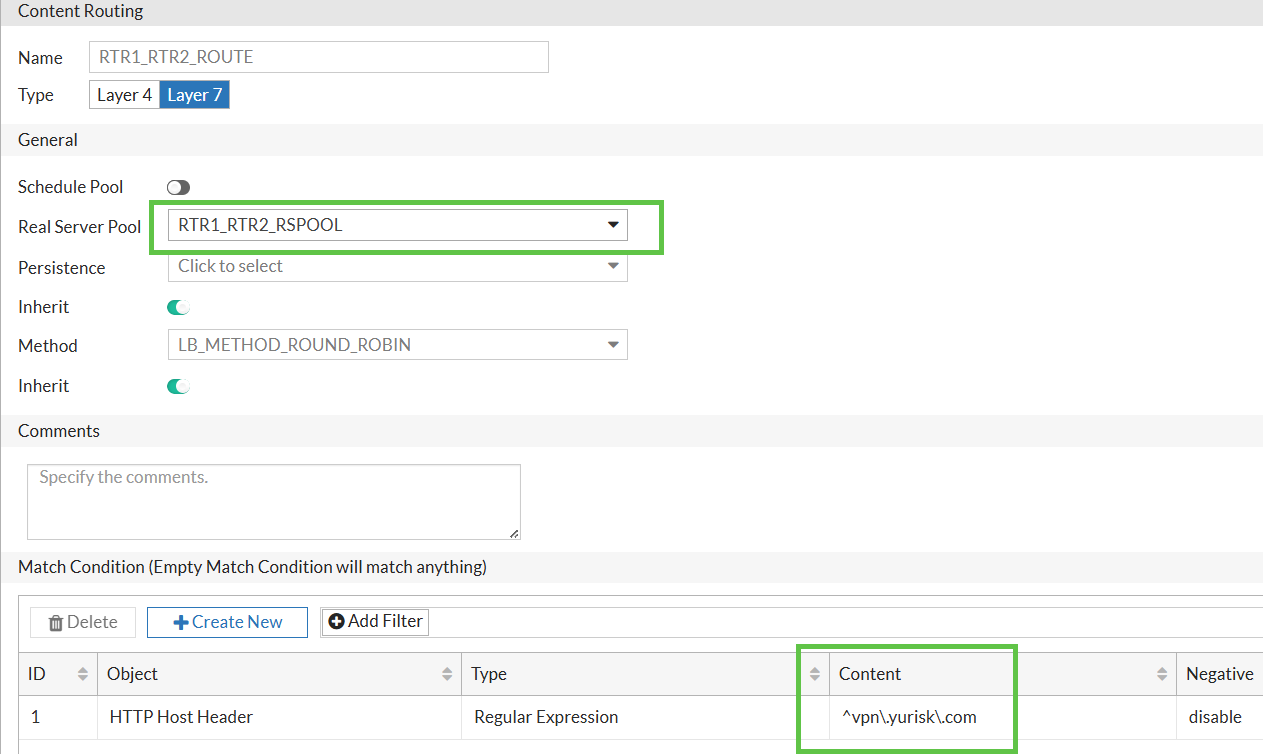
Rule for oldvpn.yurisk.com:
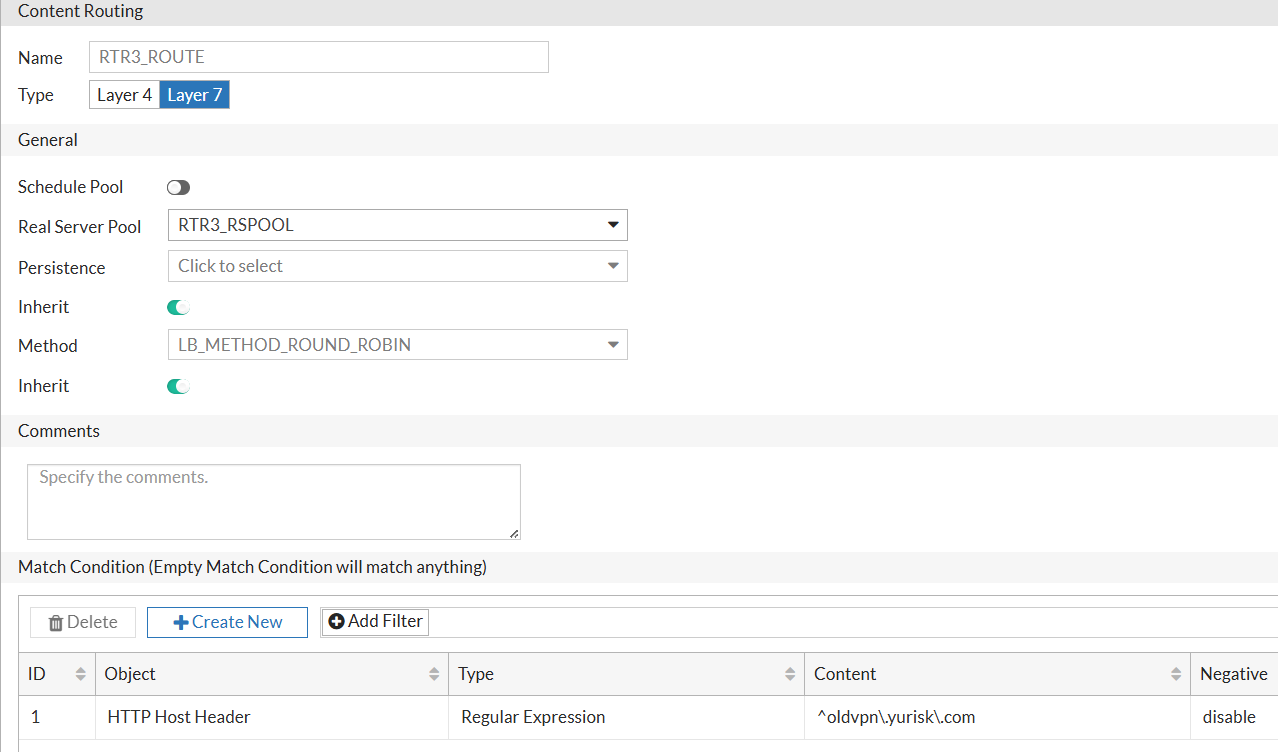
Final look of Content Routing rules:

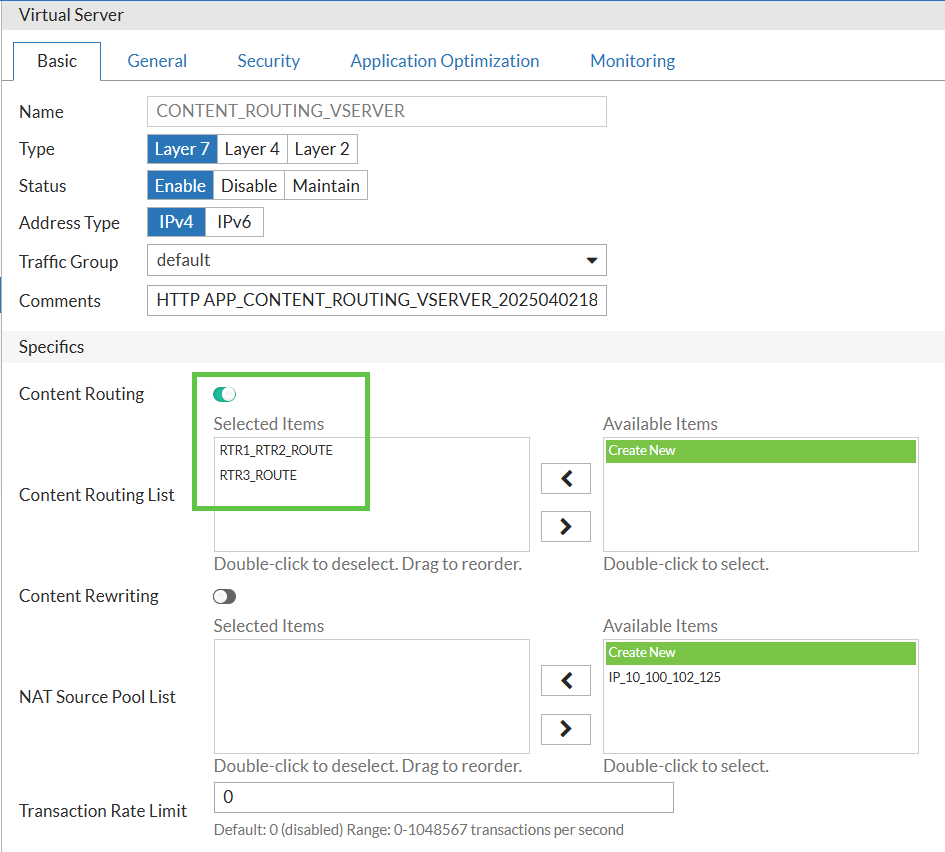
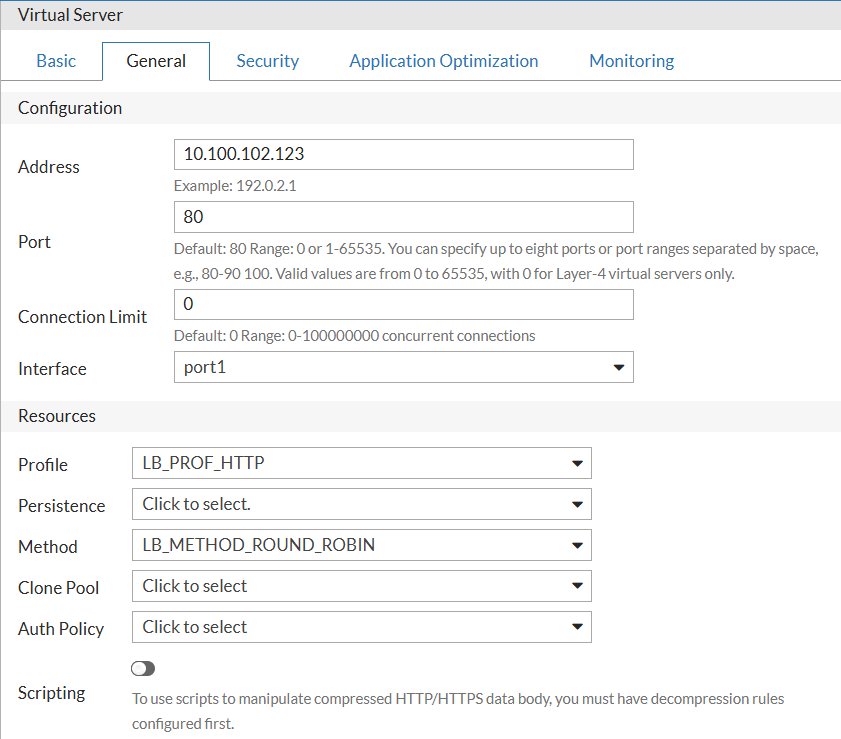
Finally, I will combine all the above into the Virtual Server. Not seen here, but when creating the vserver, I have to specify the default/fallback pool (the one with all 3 servers) in the Real Servers Pool field. I cannot leave it empty. But the Content Routing rules, which I enable and specify, will be used to route the traffic to the correct pool based on the Host header as they have precedence over the default Server Pool.
Verification
I will try to enter from the same client PC 10.100.102.19 to both web pages - oldvpn.yurisk.com and vpn.yurisk.com. The first one will be routed to RTR3, the second one to RTR1 or RTR2.

-
CLI Configuraiton
config system health-check
  edit "HLTH_HTTP_STATUS_CHECK"
    set type http
    set port 80
  next
end
config load-balance profile
  edit "app_CONTENT_ROUTING_VSERVER_20250402185619"
    set type http
  next
end
config load-balance real-server
  edit "RTR1"
    set ip 10.100.102.113
  next
  edit "RTR2"
    set ip 10.100.102.115
  next
  edit "RTR3"
    set ip 10.100.102.117
  next
end
config load-balance pool

  edit "RTR1_RTR2_RSPOOL"
    set health-check-ctrl enable
    set health-check-list HLTH_HTTP_STATUS_CHECK
    set real-server-ssl-profile NONE
    config  pool_member
      edit 1
        set pool_member_cookie rs1
        set real-server RTR1
      next
      edit 2
        set pool_member_cookie rs2
        set real-server RTR2
      next
    end
  next
  edit "RTR3_RSPOOL"
    set health-check-ctrl enable
    set health-check-list HLTH_HTTP_STATUS_CHECK
    set real-server-ssl-profile NONE
    config  pool_member
      edit 1
        set pool_member_cookie rs1
        set real-server RTR3
      next
    end
  next
  edit "RTR1_RTR2_RTR3_RSPOOL"
    set health-check-ctrl enable
    set health-check-list HLTH_HTTP_STATUS_CHECK
    set real-server-ssl-profile NONE
    config  pool_member
      edit 1
        set pool_member_cookie rs1
        set real-server RTR1
      next
      edit 2
        set pool_member_cookie rs2
        set real-server RTR2
      next
      edit 3
        set pool_member_cookie rs3
        set real-server RTR3
      next
    end
  next
end
config load-balance method
  edit "app_CONTENT_ROUTING_VSERVER_20250402185619"
  next
end
config load-balance content-routing
  edit "RTR1_RTR2_ROUTE"
    set load-balance-pool RTR1_RTR2_RSPOOL
    config  match-condition
      edit 1
        set type regular-expression
        set content "^vpn\\.yurisk\\.com"
      next
    end
  next
  edit "RTR3_ROUTE"
    set load-balance-pool RTR3_RSPOOL
    config  match-condition
      edit 1
        set type regular-expression
        set content "^oldvpn\\.yurisk\\.com"
      next
    end
  next
end
config load-balance virtual-server
  edit "CONTENT_ROUTING_VSERVER"
    set type l7-load-balance
    set interface port1
    set ip 10.100.102.123
    set load-balance-profile LB_PROF_HTTP
    set content-routing enable
    set content-routing-list RTR1_RTR2_ROUTE RTR3_ROUTE
    set load-balance-method LB_METHOD_ROUND_ROBIN
    set comments "HTTP APP_CONTENT_ROUTING_VSERVER_20250402185619"
    set traffic-group default
  next
end
Debug and Verificaiton
-
get system perf Show general load on the FAD:
FortiADC-VM # get sys performance
CPU usage:    0% used, 100% idle
Memory usage: 16% used
System Load:  0
Uptime:       3 days  0 hours  14 minutes
-
The usual diagnose sys top works as well.
FortiADC-VM # diagnose system top
Mem: 2767204K used, 13527476K free, 4303094K shrd, 14588K buff,
1163640K cached
CPU:  0.0% usr  0.0% sys  0.0% nic  100% idle  0.0% io  0.0% irq
0.0% sirq
Load average: 0.71 0.35 0.28 1/256 19168
  PID  PPID USER     STAT   VSZ %VSZ CPU %CPU COMMAND
 2464     1 root     S    1440m  9.0   0  0.0 /bin/adfsproxy
 2460     1 root     S    1418m  8.8   0  0.0 /bin/ocgs
 4305     1 root     S    1369m  8.5   0  0.0 /bin/mysqld
  --defaults-file=/etc/mysql/my.cnf --skip-grant-tables --ski
 2492     1 root     S    1114m  6.9   0  0.0 /bin/restapi 2
 2491     1 root     S    1110m  6.9   0  0.0 /bin/restapi 1
 2488     1 root     S     928m  5.8   0  0.0 /bin/ptd
 2437     1 root     S     726m  4.5   0  0.0 /bin/alertd
 2778     1 root     S     644m  4.0   0  0.0 /bin/infod
 2461     1 root     S     626m  3.9   0  0.0 /bin/hasyncd
 -CUT-
-
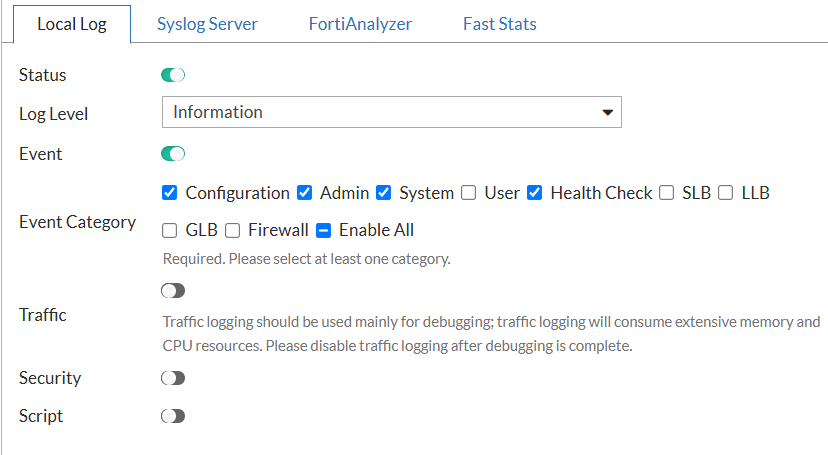
Sometimes, it is worth increasing Logs verbosity: Log & Report → Logs Settings
-
Debug of a specific FAD module is done with diagnose debug module <name> all, dia deb enable.
FortiADC-VM # diagnose debug module
 adfs                   set/get debug level for AD FS daemon
 alertd                 set/get debug level for alert events and metric
 apisecd                set/get debug level for apisecd
 authd                  set/get debug level for authd
 av                     set/get debug level for anti-virus daemon
 awsd                   set/get debug level for awsd
 bfd                    set/get debug level for bfd daemon
 bgpd                   set/get debug level for bgpd daemon
 cm_client              set/get debug level for cm_client daemon
 cmdb                   set/get debug level for CLI and CMDB
 cmdb_event             set/get debug level for cmdb event
 crlupdated             set/get debug level for crlupdated daemon
 dnsd                   set/get debug level for dnsd
 dnsproxy               set/get debug level for dnsproxy daemon
 fast_statis            set/get debug level for fast_statis events
 fcnacd                 set/get debug level for fcnacd
 flg_accessd            set/get debug level for flg_accessd daemon
 flg_indexd             set/get debug level for flg_indexd daemon
 flg_reportd            set/get debug level for flg_reportd daemon
 fnginx                 set/get debug level for fnginx daemon
 forticldd              set/get debug level for forticldd daemon
 gdns                   set/get debug level for gdns daemon
 -CUT-
-
Show VM license status dia deb vm-license:
FortiADC-VM #  dia deb vm-license
Serial-Number: FADV0000000TRIAL
License info : Trial License is in use.(Expire in 11 days 20 hours 57 mins)
License CPU  : 0
Contract CPU : 0
-
For TAC cases, you may gather all the logs/configs/current stats in System → Debug → Save Debug File.
-
The common exe ping, exe traceroute, exe reboot are available as well.
-
And, of course, the sniffer we know from Fortigate is here too: diagnose sniffer packet:
diagnose sniffer packet any 'port 443'

interfaces=[any]
filters=[port 443]
5.440606 port1 in 10.100.102.19.50110 -> 10.100.102.90.443:
     psh 3293991010 ack 2459888613
0x0000   0000 0000 0001 b42e 990e 3ea5 0800 4500
0x0010   0347 7843 4000 8006 9e38 0a64 6613 0a64
0x0020   665a c3be 01bb c456 5062 929e ebe5 5018
0x0030   2012 b05c 0000 1703 0303 1a00 0000 0000
-
Show used disk space diag hardware get sysinfo df or fnsysctl df -h:
diag hardware get sysinfo df

FortiADC-VM # diag hardware get sysinfo df
Filesystem   Size      Used Available Use% Mounted on
/dev/root  674.7M    498.0M    162.6M  75% /
none            0         0         0   0% /proc
none            0         0         0   0% /sys
none            0         0         0   0% /sys/kernel/debug
none       512.0M     31.0M    481.0M   6% /tmp
none            0         0         0   0% /dev/pts
none       512.0M    390.2M    121.8M  76% /dev/shm
none       256.0M         0    256.0M   0% /tmp2
none       512.0M     17.3M    494.7M   3% /tmp3
none       128.0M     16.5M    111.5M  13% /tmp_hc_root
none       560.0M      4.0K    560.0M   0% /tmp_av
cgroup       7.8G         0      7.8G   0% /sys/fs/cgroup
cgroup          0         0         0   0% /sys/fs/cgroup/memory
cgroup          0         0         0   0% /sys/fs/cgroup/tmpfs_control
/dev/sda1  183.6M    149.7M     24.1M  86% /data
/dev/sdb1   29.4G    422.1M     27.4G   1% /var/log
/dev/sda3  368.3M     76.6M    272.1M  22% /home
/dev/sdb1   29.4G    422.1M     27.4G   1% /var/log
/dev/sda3  368.3M     76.6M    272.1M  22% /home
none       512.0M         0    512.0M   0% /var/ps_cache
none            0         0         0   0% /proc
tracefs         0         0         0   0% /sys/kernel/debug/tracing
-
Show active settings for an interface get system interface [name]
FortiADC-VM # get system interface port1
type                          : physical
dedicate-to-mgmt              : disable
mode                          : dhcp
vdom                          : root
redundant-master              :
ip                            : 10.100.102.90/24
allowaccess                   : https ping ssh http
mtu                           : 1500
speed                         : auto
status                        : up
retrieve_physical_hwaddr      : disable
mac-addr                      : 00:0c:29:64:1e:2b
flow-sniffer                  : disable
retrieve_dhcp_gateway         : disable
wccp                          : disable
trust-ip                      : disable
recv-seg-offload-override     : disable
send-seg-offload-override     : disable
-
Errors and such on the interfaces diagnose hardware get deviceinfo nic-detail:
FortiADC-VM # diagnose hardware get deviceinfo nic-detail
Interface: port1
driver: vmxnet3
version: 1.4.a.0-k-NAPI
firmware-version:
expansion-rom-version:
bus-info: 0000:03:00.0
supports-statistics: yes
supports-test: no
supports-eeprom-access: no
supports-register-dump: yes
supports-priv-flags: no

Settings for port1:
        Supported ports: [ TP ]
        Supported link modes:   1000baseT/Full
                                10000baseT/Full
        Supported pause frame use: No
        Supports auto-negotiation: No
        Supported FEC modes: Not reported
        Advertised link modes:  Not reported
        Advertised pause frame use: No
        Advertised auto-negotiation: No
        Advertised FEC modes: Not reported
        Speed: 10000Mb/s
        Duplex: Full
        Port: Twisted Pair
        PHYAD: 0
        Transceiver: internal
        Auto-negotiation: off
        MDI-X: Unknown
        Supports Wake-on: uag
        Wake-on: d
        Link detected: yes

Inter-|   Receive
 face |bytes    packets errs drop fifo frame compressed multicast
 port1: 19336081  187098    0    0    0     0          0
 2228 85240755   69852    0    0    0     0       0          0
-
Show all configured IPs on FAD interfaces dia netlink ip list:
FortiADC-VM # diagnose netlink ip list
IP=127.0.0.1 MASK=255.255.255.0 index=1 devname=lo
IP=127.129.1.1 MASK=255.255.255.255 index=1 devname=lo
IP=10.100.102.90 MASK=255.255.255.0 index=4 devname=port1
IP=13.13.13.33 MASK=255.255.255.0 index=7 devname=port2
IP=169.254.30.43 MASK=255.255.0.0 index=19 devname=haport0
-
Show ARP table diagnose netlink neighbor list:
FortiADC-VM #  diagnose netlink neighbor list
Address           Age(min)   Hardware Addr      Interface
10.100.102.1      21         21:3f:1c:06:f8:57  port1
10.100.102.19     4237       b4:2e:99:0e:3e:a5  port1
-
Show routing table get router info routing-table all:
FortiADC-VM # get router info routing-table all
Codes: K - kernel route, C - connected, S - static, O - OSPF, B - BGP
       P - PPPoE, i - isp, D - dhcp, > - selected route, * - FIB route

S>* 0.0.0.0/0 [10/0] via 10.100.102.1, port1
C>* 10.100.102.0/24 is directly connected, port1
C>* 13.13.13.0/24 is directly connected, port2
C>* 169.254.0.0/16 is directly connected, haport0
-
Show kernel boot messages: fn dmesg.
-
Show daemons crash logs (if there were crashes): diagnose crashlog list.
I also write cheat sheets/scripts/guides to help in daily work, so make sure to check out my Github at https://github.com/yuriskinfo and https://www.linkedin.com/in/yurislobodyanyuk/