Checkpoint API tutorial, part 1 - getting started
In this, 1st part of tutorial series, I will show how to enable remote access to API on Checkpoint Management Server, verify that it is running and is indeed enabled for remote access, and create first Network object - Host via HTTP request. All this I will do in Postman software, so no coding skills are required.
Introduction
Before diving in it is worth knowing those things about Checkpoint API:
-
API is a Management Server only feature. There is no API on the firewall gateway so far, but I heard Checkpoint are working on it as well.
-
API in Checkpoint can be accessed in 4 ways: Web/HTTP REST API, SmartConsole applet CLI,
mgmt_cliCLI tool (available on both - Management and local PC), and GAIAclish. -
Web API service listens on the same port configured for the GAIA management portal access.
-
Access to Web API is via https only (naturally).
-
API first appeared in Checkpoint R80.
-
API is versioned as 1.x for the current R8x train. API versions will update with major version releases (e.g. R80.20 to R80.30), as well as optionally with Jumbo Hotfixes.
-
API is part of the Management server: you don’t need to install/update or manage it in any way. Once the Management is installed, the API is inside.
-
All previous API versions are available on every Management version. E.g. the current/latest API version on R80.40 is v1.6, but you can also use API v1.5, v1.4 etc on it. You just append to your API commands the version explicitly. This ensures that scripts/dashboards developed for one API version will work in the future.
-
API versions are mostly compatible. After the major change (81 additions) from R80 to R80.10, most of the changes are either addition of new API functions, or addition of new properties to existing ones. So, while there is no guarantee, it is not necessary to cling to a specific version fearing the code will break.
-
All Web API requests will start with the path
web_api. This way Checkpoint can differentiate HTTP requests to Web API versus requests to GAIA portal.
Now, let’s configure something.
Enable API remote access and verify
API is installed and enabled by default, except for the corner case of low memory - "By default, the API server is active on management servers with 4GB of RAM (or more) and on stand-alone servers with 8GB of RAM (or more)".
So, provided your server has enough of RAM, next step is to allow remote access to the API, otherwise only local to Management server access is possible.
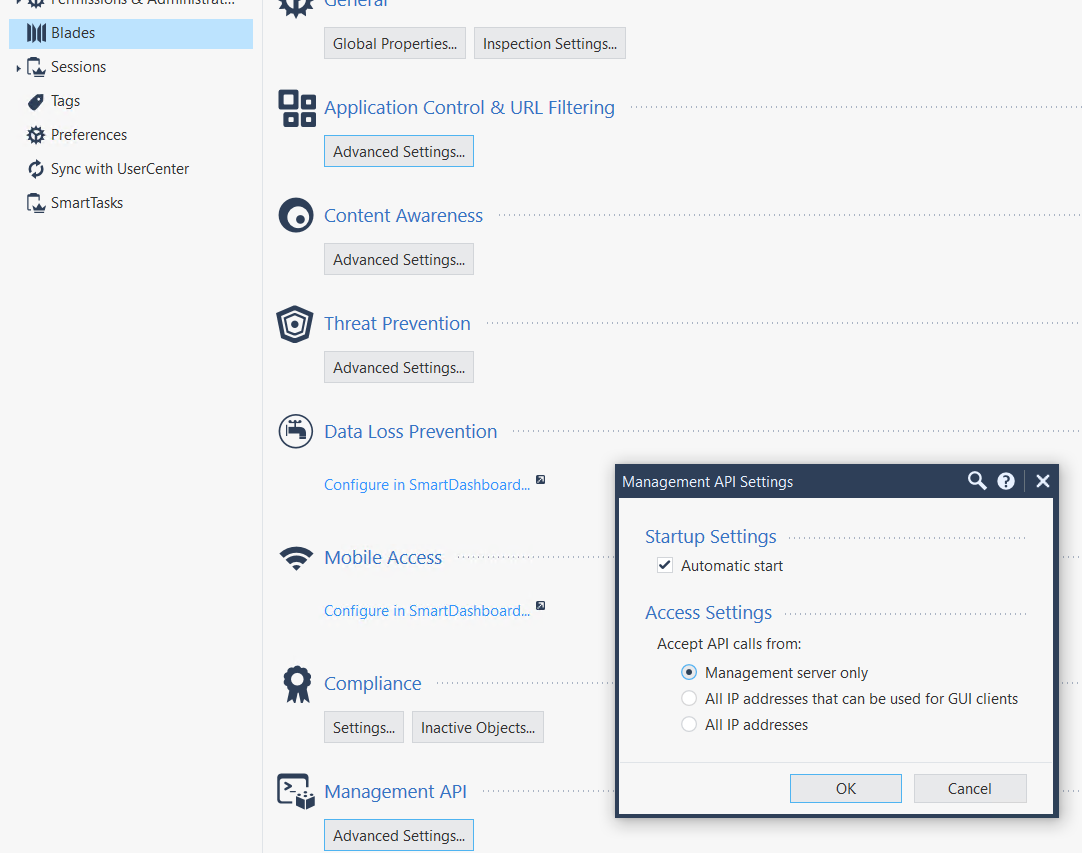
To do so, in the SmartConsole, go to Manage and Settings → Blades → Management API → Advanced Settings and check either All IP addresses (this removes IP restrictions on the API server level, firewall secuity rules still work as expected if there any [and they should be]) or All IP addresses that can be used for GUI clients (this references GUI clients setting for the SmartConsole access).
Next, click on Publish and Install. Then restart the API service on the Management server on CLI in Expert mode, no other services are affected, so no downtime: api restart.
You should see the output like that:
[Expert@CP80-40:0]# api restart
2021-Apr-21 12:35:36 - Stopping API...
2021-Apr-21 12:35:39 - API stopped successfully.
2021-Apr-21 12:35:39 - Starting API...
. . . . . . . . . . . . .
2021-Apr-21 12:36:51 - API started successfully.
Here comes the first verificaiton task - make sure the change actually took effect. It happens that you need to ask the Management twice to do this - I had to do Policy Install twice after changing the access. Or you’ll have to restart the API service twice, happens.
The following will show the settings that are in effect:
api status
[Expert@CP80-40:0]# api status
PI Settings:
---------------------
Accessibility:                      Require ip 127.0.0.1 (1)
Automatic Start:                    Enabled (2)

Processes:

Name      State     PID       More Information
-------------------------------------------------
API       Started   32042
CPM       Started   10098     Check Point Security Management Server is running and ready (3)
-
This means the API is ready to accept requests only sourced from the Management server itself, the default state, not good.
-
Unless someone messed with the Managent it should be
Enabled -
Self-explanatory
After setting, in this case, in SmartConsole to allow from IPs allowed the GUI access, the output will look:
Expert@CP80-40:0]# api status

API Settings:
---------------------
Accessibility:                      Require all granted (1)
Automatic Start:                    Enabled

Processes:

Name      State     PID       More Information
-------------------------------------------------
API       Started   911
CPM       Started   10098     Check Point Security Management Server is running and ready
-
The state changed to what we desire, good.
Create authenticated session, record session identifier
Before we can talk to API, we have to authenticate ourselves to the Management server. This process will also authorize our session to do/query only things our user is allowed via administrator profile assigned on the Management server.
To do so, we start every new API session with login request.
|
Note
|
As this is a tutorial on Web API, I will not include mgmt_cli, clish and SmartConsole CLI applet in our discussion, but just be aware the process is the same - 1st you log in, then you work with the API.
|
On successful login request, the API service will answer with JSON formatted data in the body.
In this tutorial I will use admin user with full privileges, something you may stay away in production firewall. I will, at a later time, show how to apply admin profiles to the user or alternatively use api-key instead of username/password.
sid is one of the parameters returned by login POST request (we talk with API in HTTP/1.1) and it contains the one-time authentication token we need to save for further requests in this session.
Ok, now, that we know enough to be dangerous, let’s make a login POST request.
Create a login session
If you don’t know, Postman is the (free) software with GUI for testing API. Even if in production you work in code (Python/Golang/etc.), I highly recommend getting to know this tool, as it allows to understand what is going on with any API and without resorting to print on every other line of code.
I assume you already downloaded the Postman and have it open.
We need to set the following parameters for our POST request session:
-
IP address and port of the Management server: whom we are going to query.
-
username/password of administrator: by administrator I mean any user that can login into SmartConsole/GAIA. We set it inside the request body in JSON format. In the JSON format it will look as (I am using
qwe123for the password just because it is a lab, don’t do it in production):
{
    "user" : "admin",
    "password" : "qwe123"
}
-
Content-type: applicaiton/jsonheader. Hint to Postman, otherwise it will try to guess appropriate type of the content and may do it wrong. -
path to login resource: We request
web_api/loginresource on the API server.
The screenshot of the above settings:
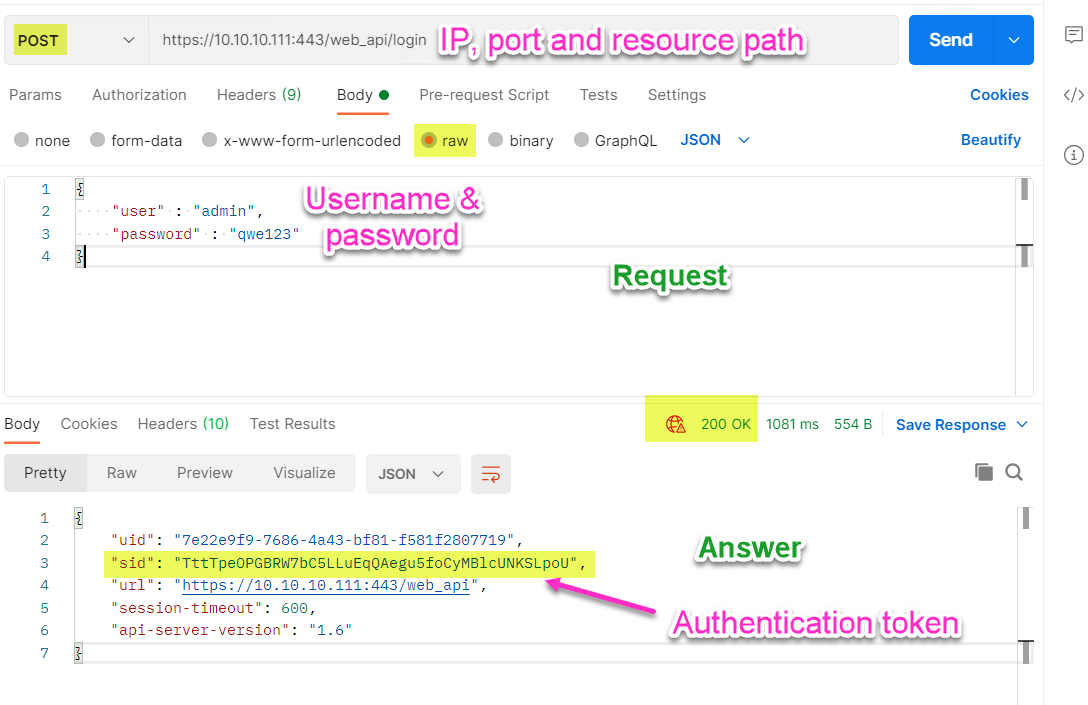
As you can see, we got in reply sid with the authentication token. Now we can copy its value and move to the next step - creating a Host object.
Create a Host object and publish the result
First, we need to know what API function creates a Host object. This can be looked up at Checkpoint API documentation .
From there we learn that the required parameters are x-chkp-sid header, name, and ip-address and we should request /web_api/add-host.
x-chkp-sid will contain the sid token and the rest is obvious. So, let’s create a host object named Dummy\_33 with the IP address of 33.33.33.33.
Again, with these parameters I construct a new request. The bottom picture is of the answer to the request:
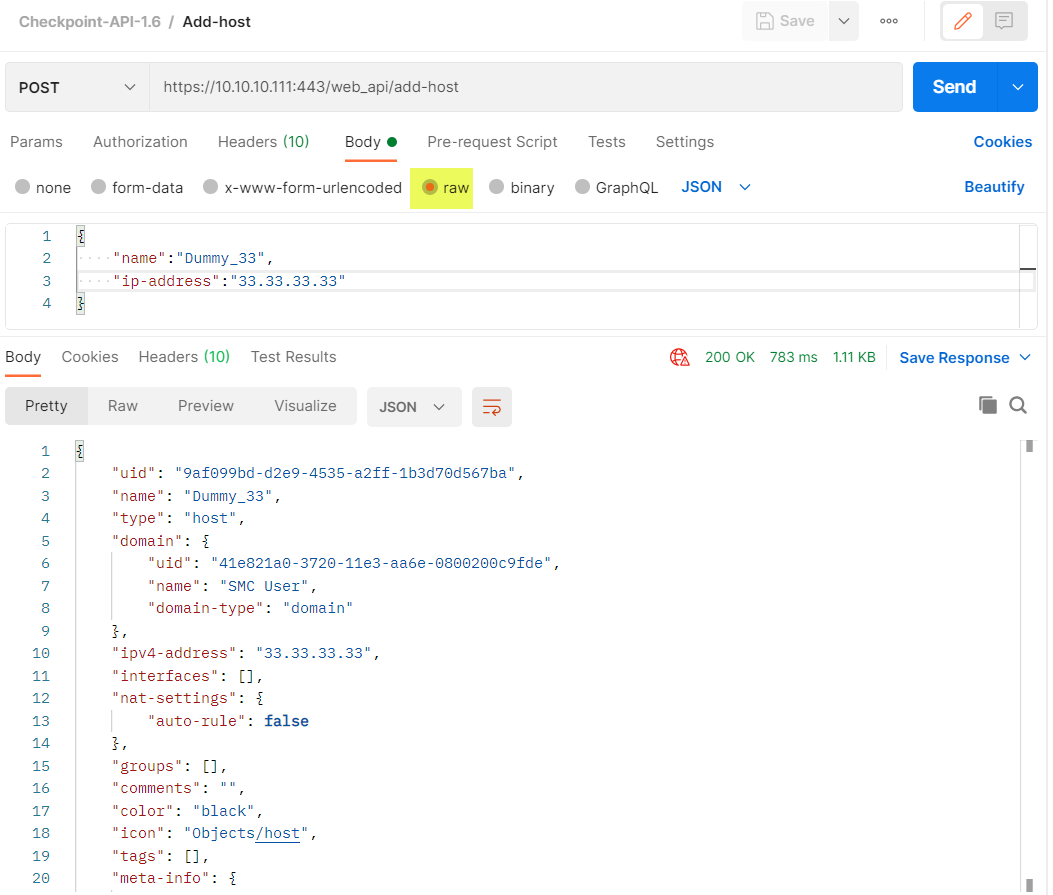
As seen above, the object was successfully (response code 200) created. The final step is to publish the result, so all Checkpoint admins will be able to use this object. We need to send POST request for the resource /web_api/publish using the same token from sid and Content-type: applicaiton/json header. I’ll live it as an exercise.
Verification
Few points about verification:
-
In Web API, always check the HTTP response code: anything but
200 OKmeans something went wrong. -
Additionally, look in the body of the response for clues on what wasn’t right.
Here are 2 examples of something going wrong.
Case 1: Trying to reference a property of the object that doesn’t exist
I tried to set property tags while there is no such one, the tag is the correct property:
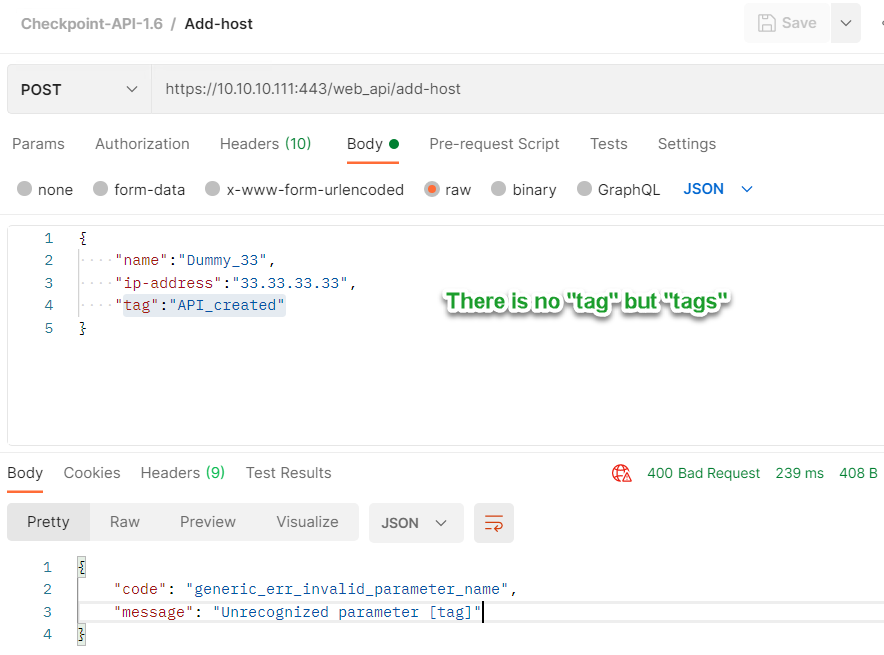
As you can see, the response message tells me exactly what was wrong.
Case 2: Sending POST request as a form instead of the JSON in the body:

Checkpoint gives exact reason in the message as well. This is in addition to response error code of 400 bad Request.
That’s all for this part in which I showed how to create login session, obtain authentication token, create host object, and publish the result. In the next part I will talk about changing and installing the Security Policy.
Follow me on https://www.linkedin.com/in/yurislobodyanyuk/ not to miss what I publish on Linkedin, Github, blog, and more.